Showing posts with label iscsi. Show all posts

iSCSI Chapter 7 - Practical Testing part 3 - Final

before reading this chapter, you may read the related articles below


iSCSI

7. Practical Testing part 3 - Final

7-1. Reverse Test

Switch to the server DC01
Bring Disk 1 back to online

Open file explorer to verify it is back and ready to use

Check the file "Test from FS02.txt" is available to open and modify.


7-3. Review


  1. iSCSI is drive/volume base, not folder base
  2. iSCSI is not a share. It cannot be used on 2 different servers at the same time.
  3. It must be taken offline from the server and bring it online on the other server to use


iSCSI Chapter 6 - Practical Testing part 2

before reading this chapter, you may read the related articles below


iSCSI

6. Practical Testing part 2

6-1. Create the second initiator

Switch to the server "FS02", Select iSCSI Initiator in the server manager, Tools tab

Click "Yes"

Type "10.0.0.3" as the target IP Address and click "Quick Connect..."

It is connected to the target and click "Done"

Click the "Volume and Devices" tab, Click "Auto Configure"

The 2 Volumes are in the list

Open file explorer, no extra disks or volumes beside drive c:

6-2. Mount the disks

Right on the start, click "Disk Management"

Both disks are offline. Right click on the Disk 1, select "Online"

Bring Disk 2 online

Both disks are online without initializing because they have been initialized at the first initiator (DC01)

Change the drive letter for the 2 disks as the same letter we did on the DC01
Open file explorer to verify

6-3. Verify the file created from DC01 is available to use

Check the DC01.txt is available to open and modify from the drive FS01iscsi02 (V:), "Test from DC01" folder

6-4. Create a folder and file in the other disk to do the reverse test

Now, Create a folder named "Test from FS02" and a text file in the folder named "Test from FS01.txt". Type some text in the file and save it.

Go back to the disk management and take the Disk 1 (7.89 GB) offline

Open file explorer to verify the Disk 1 is offline


iSCSI Chapter 5 - Practical Testing part 1

before reading this chapter, you may read the related articles below


iSCSI

5. Practical Testing part 1

In this practical test, the testing processes are in below

  1. a folder will be created in the first initiator, then create a file in the folder.
  2. Then, take both virtual disks offline from the first initiator.
  3. Create the second initiator then bring those 2 disks online.
  4. verify the file and folder which created in the first initiator are able to read and modify in the second initiator.

5-1 Create folder and file in the first initiator

In the first initiator (DC01), open file explorer, click on the FS01iscsi02(V:) drive
Create a folder named "Test from DC01" in the V: drive


Create a text file named "DC01.txt" in the "Test from DC01" folder, and type some text in there.


5-2. Offline the 2 virtual disks

Go to Disk Manager, right click on the Disk 2 (19.90 GB), click "Offline"

The status of Disk 2 is offline now

Do the same process to the Disk 1 (7.89 GB) as disk 2, to take it offline

Verify from disk manager and file explorer that both of the disk 1 and disk 2 are not available now

5-3. Assign the second Initiator IP address to the Target

Switch to server "FS01", right click on the iSCSI target "fs01iscsitatget" and click "Property"

Click "Initiators"

There is only one initiator (10.0.0.1) in the list.
Click "Add"

Select "IP Address" and type "10.0.0.5" (it is the IP address of the server FS02)
Click "OK"

There are 2 initiators assigned to the target now, Click "OK"

Verify 2 initiators are assigned to the Target


iSCSI Chapter 4 - Configure the iSCSI Initiator

before reading this chapter, you may read the related articles below


iSCSI

4. Configure the iSCSI Initiator

4-1 Create the First iSCSI Initiator on DC01

Switch to the domain controller "DC01"
Open file explorer, Click "This PC", there is no other hard drive besides C drive.

In the server manager. Click "Tools", Select "iSCSI Initiator"

Click "Yes" to start the Microsoft iSCSI service

Type "10.0.0.3" in the Target textbox, then Click "Quick Connect..."

The Target is Connected, click "Done"

Click "Volume and Devices" tab

Click "Auto Configure"

The 2 volumes just created appear in the Volume List, then Click "OK"

4-2. Configure the 2 iSCSI disks, bring them online

Right click Windows Logo, Select "Disk Management"

Disk 1 (7.90 GB) and Disk 2 (19.90 GB) are offline.
Right click on Disk 1, bring it online

The status of Disk 1 becomes "Not Initialized"
Right click on Disk 2, bring it online

Right click on Disk 1, Select "Initialize Disk"

Click "OK"

4-3. Mount the disk 1 (7.89 GB) volume

Now the status of the both disks are online but they are still unallocated
Right click on Disk 1 volume, Select "New Simple Volume..."

Click "Next"

Use the default size, Click "Next"

Select "Q" as the drive letter, click "Next"

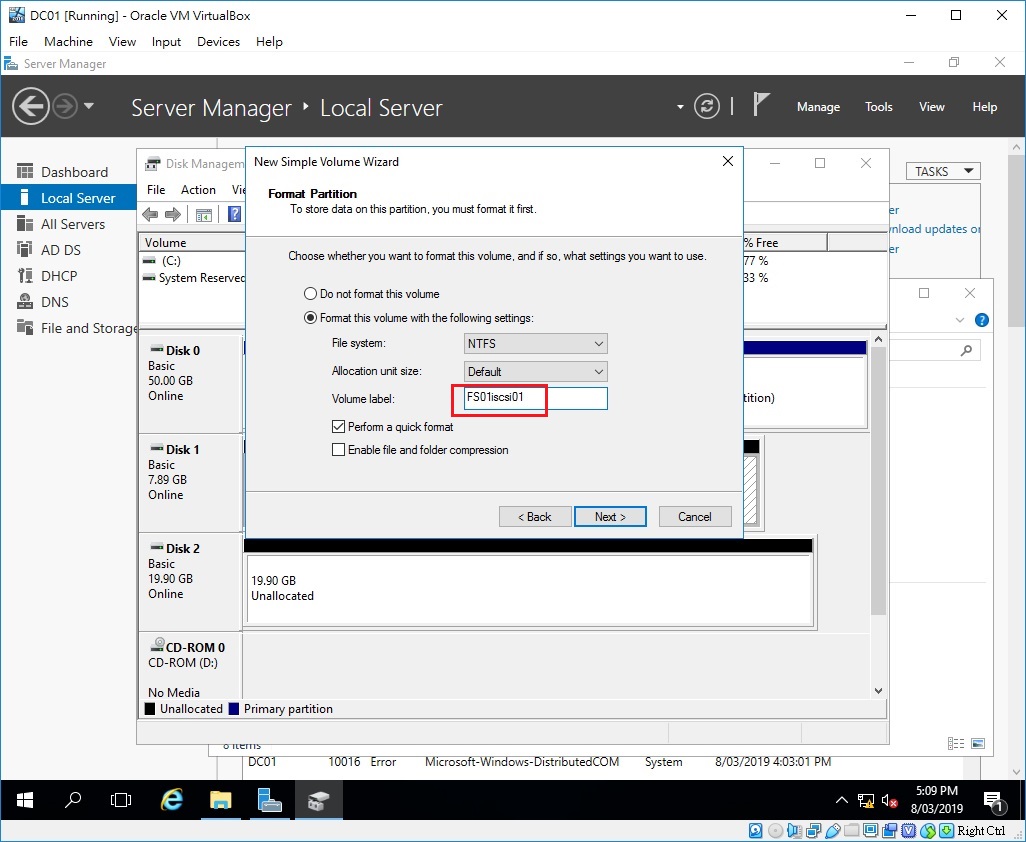
Type "FS01iscsi01" in the textbox as the volume label

Click "Finish"

Now the disk Q is ready to use, verify from  disk manager and file explorer.
The Disk 2 still unallocated

4-4. Mount the disk 2 (19.90 GB) volume

Right click on the 19.90 GB, Select "New Simple Volume..."

Click "Next"

Keep the default size, click "Next"

Select "V" as the drive letter, Click "Next"

Type "FS01iscis02" for the volume label

Click "Finish"

Now, both disks are ready to use.
Verify from disk management and file explorer


4-5. Verification

Switch back to the server FS01, Click "iSCSI", both of the Virtual Disk Status become "Connected"