Showing posts with label FSRM. Show all posts

FSRM Chapter 1 - Overview FSRM, Install and Configure SMTP

Related chapters

FSRM Chapter 1 - Overview FSRM, Install and Configure SMTP
FSRM Chapter 2 - Install and Configure FSRM
FSRM Chapter 3 - Quota
FSRM Chapter 4 - File Screening
FSRM Chapter 5 - Classification
FSRM Chapter 6 - Report

FSRM

0. Overview

0-1. What is FSRM

File Server Resource Manager (FSRM) is a role service in Windows Server that enables you to manage and classify data stored on file servers. You can use File Server Resource Manager to automatically classify files, perform tasks based on these classifications, set quotas on folders, and create reports monitoring storage usage. (Refer to Microsoft FSRM Overview)

0-2. Before the Lab start

The setting of this lab is based on the chapter Storage Space, iscsi and FSRM Lab Environment Preparation.

0-3 Configuration of Computers

Before doing the lab, we need to set up the lab environment. The lab environment is as the table below:

Domain Name: JamesLab.com
Domain Administrator: sysop

Computer name
DC01
FS01
FS02
IP address
 10.0.0.1
10.0.0.3 
10.0.0.5 
Role


Domain Controller,
iscsi initiator


File server,
Storage space server
iscsi target,
FSRM server
File server,
iscsi initiator


CPU
4
4
4
RAM
4
4
4
HDD


c:50GB


c:50GB
VD01:10GB
VD02:10GB
VD03:10GB
VD04:10GB
VD05:30GB
VD06:20GB
c:50GB


PS: The environment is for all three Labs. In this lab "FSRM", FS02 is not involved

1. Preparation

1-1. Check server settings and create some folders

The settings of FS01

Hard drives P, Q, V are ready. P will be the drive used in this lab

Create 4 folders in the P drive, "Mail", "IT", "Business" and "Test"


1-2. Add SMTP role

FSRM is able to send email to administrators when users exceed the quota of folders or try storing unauthorised file to the specific place. Simple Mail Transfer Protocol (SMTP) is the service for sending the email. We need to install SMTP before FSRM because the SMTP server is required when installing FSRM.

Click "Manager", select "Add Roles and Features"

Click "Next"

Click "Next"

Click "Next"

Select "SMTP Server"

Click "Add Features"

Click "Next"

Click "Next"

Click "Next"

Click "Install"

Click "Close"


1-3. Configure SMTP

Click "Tools", select "Internet Information Services (IIS) 6.0 Manager"

Right click "FS01 (Local computer)", Select "New", select "SMTP Virtual Server..."

Type "FS01" as the virtual server name, click "NExt"

Select 10.0.0.3 from the dropdown list, click "Next"

Click "Browse..."

Select P:\Mail to be the home directory, click "OK"

Click "Next"

Type the domain name "JamesLab.com" in the Domain textbox., click "Finish"

The Virtual Server "FS01" is successfully created


Articles about FSRM 

FSRM Chapter 1 - Overview FSRM, Install and Configure SMTP
FSRM Chapter 2 - Install and Configure FSRM
FSRM Chapter 3 - Quota
FSRM Chapter 4 - File Screening
FSRM Chapter 5 - Classification
FSRM Chapter 6 - Report


FSRM Chapter 2 - Install and Configure FSRM

Related chapters

FSRM Chapter 1 - Overview FSRM, Install and Configure SMTP
FSRM Chapter 2 - Install and Configure FSRM
FSRM Chapter 3 - Quota
FSRM Chapter 4 - File Screening
FSRM Chapter 5 - Classification
FSRM Chapter 6 - Report

FSRM

2. FSRM Installation and Configuration

2-1. Add FSRM role

Click "Manage", Select "Add Roles and Features"

Click "Next"

Click "Next"

Click "Next"

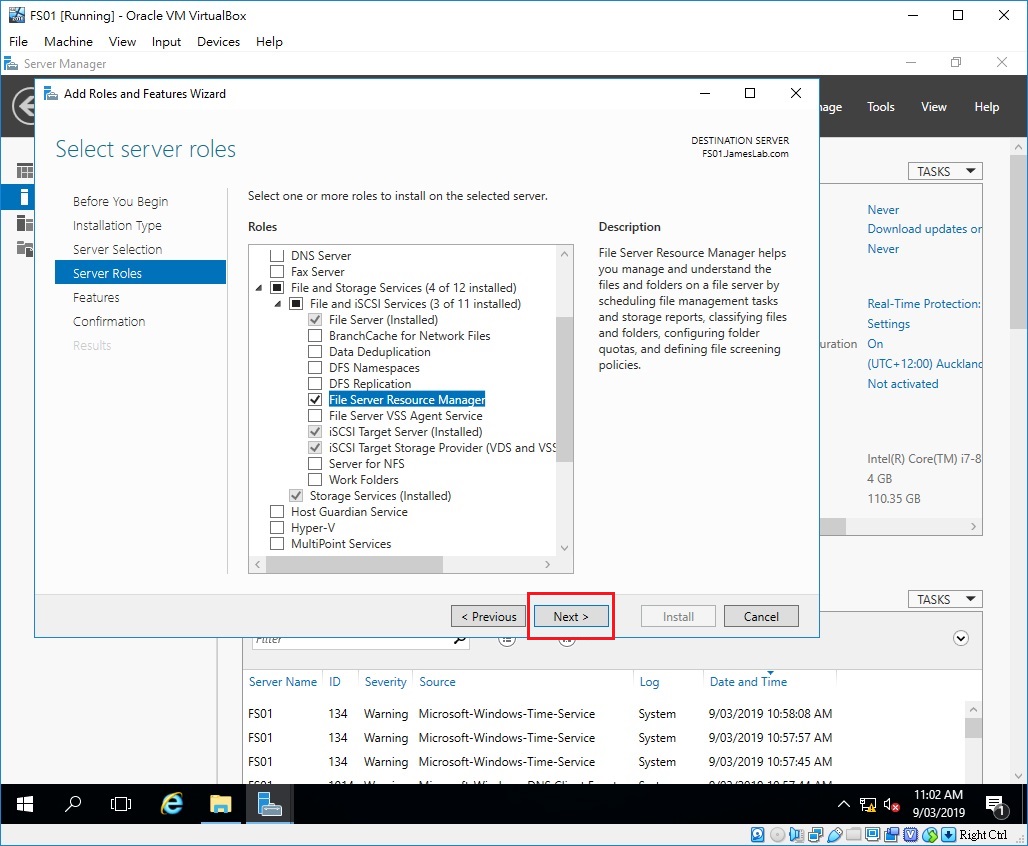
Select "File Server Resource Manager"

Click "Add Features"

Click "Next"

Click "Next"

Click "Install"

Click "Close"


2-2. Configure FSRM

Click "Tools", select "File Server Resource Manager"

There are 5 features listed at the left panel. Before using those features we need to configure it

Right click on the "File Server Resource Manager (Local)", Select "Configure Options..."

Type "10.0.0.3" for the SMTP server
Type "admin@JamesLab.com" for the Default administrator recipients
Click "Send Test Email"


Email Send successfully, click "OK"

2-3. Check the email

Open file explorer, go to the folder P:\Mail\Drop. There is a file just created by the system. It is the Email
Double click it or open it with notepad.
It tells the email address has been configured as a default


Articles about FSRM 

FSRM Chapter 1 - Overview FSRM, Install and Configure SMTP
FSRM Chapter 2 - Install and Configure FSRM
FSRM Chapter 3 - Quota
FSRM Chapter 4 - File Screening
FSRM Chapter 5 - Classification
FSRM Chapter 6 - Report


FSRM Chapter 4 - File Screening

Related chapters

FSRM Chapter 1 - Overview FSRM, Install and Configure SMTP
FSRM Chapter 2 - Install and Configure FSRM
FSRM Chapter 3 - Quota
FSRM Chapter 4 - File Screening
FSRM Chapter 5 - Classification
FSRM Chapter 6 - Report

FSRM

4. File Screening

4-1. Create File Screening

Before creating file screening we need to create a file group. Or you can create the File Groups during the process of creating the file screening

Expand "FIle Screening Management", Click "File Group"
Right click on the empty place of the middle panel, select "Create File Group".
Or Click "Create File Group" at the right window

Set "ABC Group" as the group name
Add "*.abc" to the Files to include list.
Add "*def.abc" to the File to exclude list.
Click "OK"

The ABC group is created

Click "Create File Screen..."

Click "Browse...", select "Business" folder and click "OK"

Click "Custom Properties..."
Tick "ABC group"

In the "Email Message" tab, enable "Send Email to the administrator recipients"

In the "Event Log" tab, enable "Send warning to event log"
Click "OK"

Click "Create"

Select "Save the custom file screening without creating a template"
Click "OK"

The file screen is created for the "Business" folder

4-2. Create a file which is against the file screen

Go to "P:\Business" create a file named "123.abc"
The file access denied alert message pops up

4-3. Verify it from the email

Go to "P:\Mail\Drop" double the latest file with notepad.
It tells "Unauthorized file from the "ABC group" file group detected

If we change the name of the file we tried to create to "123def.abc", then it works


Articles about FSRM 

FSRM Chapter 1 - Overview FSRM, Install and Configure SMTP
FSRM Chapter 2 - Install and Configure FSRM
FSRM Chapter 3 - Quota
FSRM Chapter 4 - File Screening
FSRM Chapter 5 - Classification
FSRM Chapter 6 - Report