1. AJAX + DOM + SQL
a. Use AJAX + DOM + SQL to create 2 drop down list
Code 1 (Client side ) : ajax.jsp
<script type="text/javascript">
var request = new XMLHttpRequest();
function getdata(s1)
{
var s=0;
s = s1.value;
request.open("GET", "GetData.jsp?cat=" + s, true);
request.onreadystatechange = updatePage;
request.send(null);
}
function updatePage()
{
if (request.readyState == 4)
{
if (request.status == 200)
{
clearSelect(); //先清除上一次選的 // Clear previous selected item
var items = request.responseText.split(","); //去掉逗號後的資料一一放入陣列
// Put all the items which separated by comma into the array and remove comma
var ss = document.getElementById('food');
for(var i=0;i<=items.length-2;i++)
{
var opt = document.createElement('option');
var txt = document.createTextNode(items[i]);
opt.appendChild(txt);
ss.appendChild(opt);
}
}
}
}
function clearSelect()
{
var foodSelect = document.getElementById('food');
for (var i = foodSelect.length - 1; i>=0; i--)
{
foodSelect.removeChild(foodSelect.options[i]);
}
}
</script>
</head>
<body>
<%
int s = 0;
if (request.getParameter("cat") != null)
s = Integer.parseInt(request.getParameter("cat"));
//以下幾行都是設定連線資料庫,用來取第一個下拉選單
// The following lines are for setting connection to database and get data to fill the drop down list
Class.forName("com.microsoft.sqlserver.jdbc.SQLServerDriver");
String connectionUrl = "jdbc:sqlserver://localhost:1433;" +
"databaseName=MyDB;user=sa;password=sa;";
Connection con = DriverManager.getConnection(connectionUrl);
Statement stmt = con.createStatement();
ResultSet rs;
rs = stmt.executeQuery("Select * From Category");
%>
//設定下拉選單
// set up the drop down list
<form id="form1" method="get" action="001.jsp">
<select name="cat" id="cat" onchange="getdata(this)">
<option>請選擇</option>
<% while(rs.next()) { %> //當有資料時,執行下面 // when data is exist, execute next
<option value="<%=rs.getInt(1) %>" //rs的第一欄轉成整數
// convert the first column data of the rs to integer
<% if (rs.getInt(1) == s) out.print("selected"); %>>
//若下拉選的(s),就是rs.getInt(1),就印出 selected,這樣選單就會留在剛剛選的項目
// If select (s) then print "selected", thus the list will remain the selected item
<%=rs.getString(2) %> //rs的第二欄是字串,顯示出來 //rs is the 2nd column string, display it
</option>
<% } %>
</select>
<select name="food" id="food">
</select>
</form>
</body>
Code 2 (server side) : GetData.jsp
<%@ page language="java" contentType="text/html; charset=UTS-8"
pageEncoding="UTF-8" import="java.sql.*"%><%
int s = 0;
if (request.getParameter("cat") != null)
s = Integer.parseInt(request.getParameter("cat"));
//這裡的"cat"本身就是1.2.3,只是將字串轉整數
// The "cat" is 1.2.3, just convert string to integer
//以下幾行都是設定連線資料庫,用來取第二個下拉選單
// The following lines are for setting connection to database and get data to fill the 2nd drop down list
Class.forName("com.microsoft.sqlserver.jdbc.SQLServerDriver");
String connectionUrl = "jdbc:sqlserver://localhost:1433;" +
"databaseName=MyDB;user=sa;password=sa;";
Connection con = DriverManager.getConnection(connectionUrl);
//設定 "準備好的SQL語法",幾個"?"就對應幾個 "pstmt.setInt(1, s);",將"S"放到"?"
// set up "the prepared SQL statement", map each"?" to each "pstmt.setInt(1, s);", and put "S" to "?"
PreparedStatement pstmt = con.prepareStatement("Select * From Foods Where CatID = ?");
pstmt.setInt(1, s);
ResultSet rs2 = pstmt.executeQuery();
while(rs2.next())
{
out.print(rs2.getString(3) + ",");
}
%>
b. AJAX verify username and password
Code 1 (Client side) : reg.jsp
</head>
<body>
<form method="post" action="inscode.jsp">
<p>使用者帳號:<input type="text" name="username" id="username" /></p>
<p>使用者地址:<input type="text" name="addr" id="addr" /></p>
<p>使用者電話:<input type="text" name="tel" id="tel" /></p>
<p><input type="submit" value="新增帳號" /> </p>
</form>
</body>
</html>
Code 2 (Server side: : inscode.jsp
Showing posts with label JavaScript. Show all posts
Showing posts with label JavaScript. Show all posts

JavaScript 6
1. Ajax DOM
a. 利用按鈕,動態加入 textbox
a. Use button to add textbox dynamically
程式碼 :011.html
Code : 011.html
<body>
<form id="form1" name="form1" method="post" action="">
<input type="button" value="ADD" onclick="addtxt()" />
</form>
</body>
</html>
<script>
function addtxt()
{
var para = document.createElement('p'); //建立 p 標籤,名為 para
// create p tag and name it as para
var info = document.createTextNode('請輸入:'); //定義 info 為一串文字
// define info as string
var txt = document.createElement('input'); //建立 input 標籤
// create input tag
txt.type = 'text'; //定義 input 標籤 ( txt )的形式為 text,也就是 textbox 標籤
// define input tag (txt) as text from, it is also as textbox tag
para.appendChild(info);
para.appendChild(txt);
document.getElementById('form1').appendChild(para);
}
</script>
執行結果:
Result:

b. 輸入文字後,送到 jsp 顯示資料
b. send the string in the textbox to jsp and display data
程式碼:011.html
Code: 011.html
<script>
var i = 1;
</script>
</head>
<body>
<form id="form1" name="form1" method="post" action="012.jsp">
<p>
<input type="button" value="ADD" onclick="add()" />
</p>
<p>
<input type="submit" name="button" id="button" value="送出" />
</p>
</form>
</body>
</html>
<script>
function add()
{
var para = document.createElement('p');
var info = document.createTextNode('Para ' + i + ':');
var txt = document.createElement('input');
txt.type = 'text';
txt.name = 'para' + i;
txt.id = 'para' + i;
i++;
para.appendChild(info);
para.appendChild(txt);
var myform = document.getElementById('form1').appendChild(para);
}
</script>
程式碼:012.jsp
code : 012.jsp
<%
Enumeration e = (Enumeration) request.getParameterNames();
while(e.hasMoreElements())
{
String parName=(String)e.nextElement();
if (parName.startsWith("para"))
out.println(parName+":" + request.getParameter(parName) + "<br>");
}
%>
c. 按一下按鈕,圖片換位置
c. click the button, picture change place
程式碼:013.html
code: 013.html
<style type="text/css">
div {
background-color: #FF3;
height: 300px;
width: 800px;
border: 2px solid #00F;
}
</style>
<script>
function myclick()
{
var myimg = document.getElementById('img1');
var divlower = document.getElementById('lower');
var divupper = document.getElementById('upper');
if ( myimg.parentNode == divupper )
{
divlower.appendChild(myimg);
}
else
{
divupper.appendChild(myimg);
}
}
</script>
</head>
<body>
<div id="upper">
<img src="Sunset.jpg" name="img1" width="300" id="img1" />
</div>
<div id="lower"></div>
<p>
<input type="submit" name="button" id="button" value="送出" onclick="myclick()" />
</p>
</body>
執行結果:
Result:


a. 利用按鈕,動態加入 textbox
a. Use button to add textbox dynamically
程式碼 :011.html
Code : 011.html
<body>
<form id="form1" name="form1" method="post" action="">
<input type="button" value="ADD" onclick="addtxt()" />
</form>
</body>
</html>
<script>
function addtxt()
{
var para = document.createElement('p'); //建立 p 標籤,名為 para
// create p tag and name it as para
var info = document.createTextNode('請輸入:'); //定義 info 為一串文字
// define info as string
var txt = document.createElement('input'); //建立 input 標籤
// create input tag
txt.type = 'text'; //定義 input 標籤 ( txt )的形式為 text,也就是 textbox 標籤
// define input tag (txt) as text from, it is also as textbox tag
para.appendChild(info);
para.appendChild(txt);
document.getElementById('form1').appendChild(para);
}
</script>
執行結果:
Result:
b. 輸入文字後,送到 jsp 顯示資料
b. send the string in the textbox to jsp and display data
程式碼:011.html
Code: 011.html
<script>
var i = 1;
</script>
</head>
<body>
<form id="form1" name="form1" method="post" action="012.jsp">
<p>
<input type="button" value="ADD" onclick="add()" />
</p>
<p>
<input type="submit" name="button" id="button" value="送出" />
</p>
</form>
</body>
</html>
<script>
function add()
{
var para = document.createElement('p');
var info = document.createTextNode('Para ' + i + ':');
var txt = document.createElement('input');
txt.type = 'text';
txt.name = 'para' + i;
txt.id = 'para' + i;
i++;
para.appendChild(info);
para.appendChild(txt);
var myform = document.getElementById('form1').appendChild(para);
}
</script>
程式碼:012.jsp
code : 012.jsp
<%
Enumeration e = (Enumeration) request.getParameterNames();
while(e.hasMoreElements())
{
String parName=(String)e.nextElement();
if (parName.startsWith("para"))
out.println(parName+":" + request.getParameter(parName) + "<br>");
}
%>
c. 按一下按鈕,圖片換位置
c. click the button, picture change place
程式碼:013.html
code: 013.html
<style type="text/css">
div {
background-color: #FF3;
height: 300px;
width: 800px;
border: 2px solid #00F;
}
</style>
<script>
function myclick()
{
var myimg = document.getElementById('img1');
var divlower = document.getElementById('lower');
var divupper = document.getElementById('upper');
if ( myimg.parentNode == divupper )
{
divlower.appendChild(myimg);
}
else
{
divupper.appendChild(myimg);
}
}
</script>
</head>
<body>
<div id="upper">
<img src="Sunset.jpg" name="img1" width="300" id="img1" />
</div>
<div id="lower"></div>
<p>
<input type="submit" name="button" id="button" value="送出" onclick="myclick()" />
</p>
</body>
執行結果:
Result:


JavaScript 5
1. DOM
a. 用 DOM 擷取 HTML中的標籤、子標籤、前一個、後一個等等
a. Use DOM to extract tags, subtags, previous ones, last ones, etc. in HTML
程式碼:002.html
Code: 002.html
<script>
var doc = document;
var n1 = doc.lastChild;
alert(n1.nodeName);
var n2 = n1.lastChild;
alert(n2.nodeName);
var n3 = n2.firstChild;
alert(n3.nodeName);
var n4 = n3.nextSibling;
alert(n4.nodeName);
</script>
執行結果:
Result:

b. 用 DOM 加上迴圈,取出 BODY 中的標籤,並一個一個顯示出來
b. Use DOM and loop to take out the tags from the BODY, and display them one by one.
程式碼:003.html
Code: 003.html
<script>
var doc = document;
var n1 = doc.lastChild;
alert(n1.nodeName);
var n2 = n1.lastChild;
alert(n2.nodeName);
alert(n2.childNodes.length);
for(var i=0;i<n2.childNodes.length;i++)
{
alert(n2.childNodes[i].nodeName);
}
</script>
c. 用 getElementsByTagName('body')[0],得到的是陣列。利用按鈕來移除標籤
c. Use getElementsByTagName('body')[0] to get data array, then use button to remove tags
程式碼:004.html
Code: 004.html
<script>
function test()
{
var b = document.getElementsByTagName('body')[0];
alert(b.nodeName);
alert(b.hasChildNodes());
alert(b.childNodes.length);
}
function removeimg()
{
var b = document.getElementsByTagName('body')[0];
for(i=b.childNodes.length-1;i>=0;i--)
{
{
var n = b.childNodes[i];
if (n.nodeName.toLowerCase() == 'img')
{
b.removeChild(n);
}
}
}
}
</script>
</head>
<body id='b1'>
<p>這是一個測試, This is a Test
<input type="button" name="button" id="button" value="Click" onclick='test()' />
<input type="button" name="button" id="button" value="Clear" onclick='removeimg()' />
</p>
<p> </p>
<img src="Sunset.jpg" width="218" height="57" />
<p> </p>
<img src="Sunset.jpg" alt="" width="218" height="57" />
</body>
</html>
d. 用 getElementsByTagName('body')[0],以及 createElement、createTextNode、appendChild 來建立及插入標籤
d. Use getElementsByTagName('body')[0] and createElement、createTextNode、appendChild to create and insert tags
程式碼:005.html
Code: 005.html
<script>
function create()
{
var doc = document;
var bodyElement = document.getElementsByTagName('body')[0];
var mynode = doc.createElement('p');
var textnode = doc.createTextNode('This is a test');
mynode.appendChild(textnode);
bodyElement.appendChild(mynode);
}
</script>
</head>
<body>
<input type="button" name="button" id="button" value="按鈕" onclick='create()' />
</body>
</html>
e. 完成插入及移除圖片的功能
e. To complete insert and remove pictures
程式碼:006_new.html
Code: 006_new.html
<style type="text/css">
#cards {
height: 800px;
width: 800px;
background-color: #FF0;
}
</style>
</head>
<body>
<p>請選擇要加入框中的圖片: Please select the pictures you want to add to the frame</p>
<p>1. <img src="cat/1.jpg" width="100" id="1"/> 2. <img src="cat/2.jpg" alt="" width="100" />
3. <img src="cat/3.jpg" width="100" /> 4. <img src="cat/4.jpg" alt="" width="100" />
5. <img src="cat/5.jpg" width="100" /></p>
<form id="form1" name="form1" method="post" action="" >
<label for="cats"></label>
<select name="cats" id="cats" >
<option value="1">1</option>
<option value="2">2</option>
<option value="3">3</option>
<option value="4">4</option>
<option value="5">5</option>
</select>
<input type="button" name="button1" id="button1" value="加入, Add" onclick='create()' />
<input type="button" name="button2" id="button2" value="清除, Clear" onclick='removeimg()'/>
</form>
<div id="cards"></div>
<p> </p>
</body>
</html>
<script>
function create()
{
var doc = document;
var myloc = document.getElementById('cards');
var myimg = doc.createElement('img');
var sel = document.getElementById('cats');
//抓下拉式選單所選到的 selectedIndex
// Grab the selectedIndex selected by the drop-down menu
var i = sel.selectedIndex;
myimg.src = 'cat/' + (eval(i)+1) + '.jpg';
myloc.appendChild(myimg);
}
function removeing()
{
var myloc = document.getElementById('cards');
if (myloc.hasChildNodes() == true)
{
for ( i = myloc.childNodes.length -1 ; i >=0; i--) //反過來刪除標籤 // delete the tag
{
myloc.removeChild(myloc.childNodes[i]);
}
}
}
</script>
執行結果:
Result:

a. 用 DOM 擷取 HTML中的標籤、子標籤、前一個、後一個等等
a. Use DOM to extract tags, subtags, previous ones, last ones, etc. in HTML
程式碼:002.html
Code: 002.html
<script>
var doc = document;
var n1 = doc.lastChild;
alert(n1.nodeName);
var n2 = n1.lastChild;
alert(n2.nodeName);
var n3 = n2.firstChild;
alert(n3.nodeName);
var n4 = n3.nextSibling;
alert(n4.nodeName);
</script>
執行結果:
Result:

b. 用 DOM 加上迴圈,取出 BODY 中的標籤,並一個一個顯示出來
b. Use DOM and loop to take out the tags from the BODY, and display them one by one.
程式碼:003.html
Code: 003.html
<script>
var doc = document;
var n1 = doc.lastChild;
alert(n1.nodeName);
var n2 = n1.lastChild;
alert(n2.nodeName);
alert(n2.childNodes.length);
for(var i=0;i<n2.childNodes.length;i++)
{
alert(n2.childNodes[i].nodeName);
}
</script>
c. 用 getElementsByTagName('body')[0],得到的是陣列。利用按鈕來移除標籤
c. Use getElementsByTagName('body')[0] to get data array, then use button to remove tags
程式碼:004.html
Code: 004.html
<script>
function test()
{
var b = document.getElementsByTagName('body')[0];
alert(b.nodeName);
alert(b.hasChildNodes());
alert(b.childNodes.length);
}
function removeimg()
{
var b = document.getElementsByTagName('body')[0];
for(i=b.childNodes.length-1;i>=0;i--)
{
{
var n = b.childNodes[i];
if (n.nodeName.toLowerCase() == 'img')
{
b.removeChild(n);
}
}
}
}
</script>
</head>
<body id='b1'>
<p>這是一個測試, This is a Test
<input type="button" name="button" id="button" value="Click" onclick='test()' />
<input type="button" name="button" id="button" value="Clear" onclick='removeimg()' />
</p>
<p> </p>
<img src="Sunset.jpg" width="218" height="57" />
<p> </p>
<img src="Sunset.jpg" alt="" width="218" height="57" />
</body>
</html>
d. 用 getElementsByTagName('body')[0],以及 createElement、createTextNode、appendChild 來建立及插入標籤
d. Use getElementsByTagName('body')[0] and createElement、createTextNode、appendChild to create and insert tags
程式碼:005.html
Code: 005.html
<script>
function create()
{
var doc = document;
var bodyElement = document.getElementsByTagName('body')[0];
var mynode = doc.createElement('p');
var textnode = doc.createTextNode('This is a test');
mynode.appendChild(textnode);
bodyElement.appendChild(mynode);
}
</script>
</head>
<body>
<input type="button" name="button" id="button" value="按鈕" onclick='create()' />
</body>
</html>
e. 完成插入及移除圖片的功能
e. To complete insert and remove pictures
程式碼:006_new.html
Code: 006_new.html
<style type="text/css">
#cards {
height: 800px;
width: 800px;
background-color: #FF0;
}
</style>
</head>
<body>
<p>請選擇要加入框中的圖片: Please select the pictures you want to add to the frame</p>
<p>1. <img src="cat/1.jpg" width="100" id="1"/> 2. <img src="cat/2.jpg" alt="" width="100" />
3. <img src="cat/3.jpg" width="100" /> 4. <img src="cat/4.jpg" alt="" width="100" />
5. <img src="cat/5.jpg" width="100" /></p>
<form id="form1" name="form1" method="post" action="" >
<label for="cats"></label>
<select name="cats" id="cats" >
<option value="1">1</option>
<option value="2">2</option>
<option value="3">3</option>
<option value="4">4</option>
<option value="5">5</option>
</select>
<input type="button" name="button1" id="button1" value="加入, Add" onclick='create()' />
<input type="button" name="button2" id="button2" value="清除, Clear" onclick='removeimg()'/>
</form>
<div id="cards"></div>
<p> </p>
</body>
</html>
<script>
function create()
{
var doc = document;
var myloc = document.getElementById('cards');
var myimg = doc.createElement('img');
var sel = document.getElementById('cats');
//抓下拉式選單所選到的 selectedIndex
// Grab the selectedIndex selected by the drop-down menu
var i = sel.selectedIndex;
myimg.src = 'cat/' + (eval(i)+1) + '.jpg';
myloc.appendChild(myimg);
}
function removeing()
{
var myloc = document.getElementById('cards');
if (myloc.hasChildNodes() == true)
{
for ( i = myloc.childNodes.length -1 ; i >=0; i--) //反過來刪除標籤 // delete the tag
{
myloc.removeChild(myloc.childNodes[i]);
}
}
}
</script>
執行結果:
Result:

JavaScript 4
1. JavaScript - Location
a. Location + reload
程式碼:每二秒重新整理一次頁面
Code: Refresh the page every 2 seconds
<script>
var now =new Date();
document.write(now);
setTimeout('window.location.reload()',2000);
</script>
執行結果:
Result:

2. JavaScript Example
a. ScrollWindow
程式碼:頁面每0.1秒自動往上捲
Code: The page automatically rolls up every 0.1 seconds
<script>
function scrollWindow() {
window.scroll(0, 1*scrollY);
if ( scrollY > 800 ) {
scrollY = 0;
window.scroll(0, 0);
}
else {
scrollY++;
}
timerID = setTimeout("scrollWindow()", 100);
}
</script>
</head>
<body onload="scrollWindow()">
XXXXX
XXXXXX...
......
</body>
PS1:
1. <body> 要有 onload="scrollWindow"
1. <body> must include onload="scrollWindow"
2. 要有內文,且超過 一頁,(這裡設定800)
2. Must have text and more than one page. The setting here is 800
3. Ajax
a. 在所有 Ajax 應用程式中基本都雷同的流程:
1. 從 Web 表單中獲取需要的資料。
2. 建立要連接的 URL。
3. 打開到伺服器的連接。
4. 設置伺服器在完成後要運行的函數。
5. 發送請求。
a. Basically the same process in all Ajax applications
1. Get the information you need from the web form.
2. Create a URL to connect to.
3. Open the connection to the server.
4. Set the function to be run after the server is finished.
5. Send the request.
b. 需要用於 XMLHttpRequest 物件的幾個方法和屬性
方法:
1. open():建立到伺服器的新請求。
2. send():向伺服器發送請求。
3. abort():退出當前請求。
屬性:
4. readyState:提供當前 HTML 的就緒狀態。
5. responseText:伺服器返回的請求回應文本。
b. Several methods and properties are required for the XMLHttpRequest object
Method:
1. open(): Creates a new request to the server.
2. send(): Sends a request to the server.
3. abort(): Exit the current request.
Attributes:
4. readyState: Provides the current state of the HTML.
5. responseText: The request-response text returned by the server.
程式碼一:
Code 1:
<script >
var request = new XMLHttpRequest();
request.open("GET", "ajaxr.html", true);
//這裡的 true 是指,非同步的意思。
// "true" means asynchronous
request.onreadystatechange = updatePage;
//這裡的 onreadystatechange是指,當頁面狀態改變時
// "onreadystatechange" means when the page status changes
request.send(null); //送出 //send
function updatePage()
{
alert(request.responseText);
}
</script>
c. 但是要加入一些判斷,程式才會完整
c. Add some determine to complete the application
程式碼二:修改 function的部分就好
Code2: Just modify the part of the function
function updatePage()
{
if (request.readyState == 4)
//這裡的 4 是指,HTTP 就緒狀態。(詳見下方PS2)
// 4 means HTTP ready status (Refer to the PS2 below)
{
if (request.status == 200)
//這裡的 200 是指,網頁讀取成功
// 200 means Web page read successfully
{
alert(request.responseText);
}
}
}
PS2:
在 Ajax 應用程式中需要瞭解五種 HTTP 就緒狀態:
0:請求沒有發出(在調用 open() 之前)。
1:請求已經建立但還沒有發出(調用 send() 之前)。
2:請求已經發出正在處理之中(這裡通常可以從回應得到內容標題部)。
3:請求已經處理,回應中通常有部分資料可用,但是伺服器還沒有完成回應。
4:回應已完成,可以訪問伺服器回應並使用它。
PS2:
There are five HTTP ready states to understand in an Ajax application:
0: The request was not issued (before calling open()).
1: The request has been established but has not yet been issued (before send() is called).
2: The request has been sent out of processing (here usually the content header section can be obtained from the response).
3: The request has been processed. Some data is usually available in the response, but the server has not completed the response.
4: The response is complete and you can access the server response and use it.
4. Ajax + JSP
a. 利用 AJAX 傳送二個值到後台,計算乘積之後再送回前台
a. Use AJAX to transfer two values to the background, calculate the product and send it back to the foreground.
程式碼 ajax002.jsp:前台
Code ajax002.jsp: front end
<script language="javascript" type="text/javascript">
var request = new XMLHttpRequest();
function calc()
//複製上面的程式,加上 function 承接下方按鈕的 onclick
/ / Copy the above program, plus function to accept the onclick button below
{
request.open("GET", "res.jsp?q1=" + document.getElementById('q1').value + "&q2=" + document.getElementById('q2').value, true);
request.onreadystatechange = updatePage;
request.send(null);
}
function updatePage()
{
if (request.readyState == 4)
{
if (request.status == 200)
{
document.getElementById('ans').innerHTML = request.responseText;
}
}
}
</script>
</head>
放二個空格相乘以及"="按鈕",並設一個 Span在後面
Multiply two spaces and "=" button" and set a Span behind
<body>
<form id="form1" name="form1" method="post" action="">
<label>
<input name="q1" type="text" id="q1" size="5" />
</label>
x
<label>
<input name="q2" type="text" id="q2" size="5" />
</label>
<input type="button" name="button" id="button" value="=" onclick="calc()"/>
<span id='ans'></span>
</form>
</body>
程式碼 res.jsp:後台
Code res.jsp: back end
<%@ page contentType="text/html; charset=utf-8" language="java" import="java.sql.*" errorPage="" %>
<%
int i, j;
i = Integer.parseInt(request.getParameter("q1"));
j = Integer.parseInt(request.getParameter("q2"));
out.print(i*j);
%>
執行結果:
Result:

a. Location + reload
程式碼:每二秒重新整理一次頁面
Code: Refresh the page every 2 seconds
<script>
var now =new Date();
document.write(now);
setTimeout('window.location.reload()',2000);
</script>
執行結果:
Result:

2. JavaScript Example
a. ScrollWindow
程式碼:頁面每0.1秒自動往上捲
Code: The page automatically rolls up every 0.1 seconds
<script>
function scrollWindow() {
window.scroll(0, 1*scrollY);
if ( scrollY > 800 ) {
scrollY = 0;
window.scroll(0, 0);
}
else {
scrollY++;
}
timerID = setTimeout("scrollWindow()", 100);
}
</script>
</head>
<body onload="scrollWindow()">
XXXXX
XXXXXX...
......
</body>
PS1:
1. <body> 要有 onload="scrollWindow"
1. <body> must include onload="scrollWindow"
2. 要有內文,且超過 一頁,(這裡設定800)
2. Must have text and more than one page. The setting here is 800
3. Ajax
a. 在所有 Ajax 應用程式中基本都雷同的流程:
1. 從 Web 表單中獲取需要的資料。
2. 建立要連接的 URL。
3. 打開到伺服器的連接。
4. 設置伺服器在完成後要運行的函數。
5. 發送請求。
a. Basically the same process in all Ajax applications
1. Get the information you need from the web form.
2. Create a URL to connect to.
3. Open the connection to the server.
4. Set the function to be run after the server is finished.
5. Send the request.
b. 需要用於 XMLHttpRequest 物件的幾個方法和屬性
方法:
1. open():建立到伺服器的新請求。
2. send():向伺服器發送請求。
3. abort():退出當前請求。
屬性:
4. readyState:提供當前 HTML 的就緒狀態。
5. responseText:伺服器返回的請求回應文本。
b. Several methods and properties are required for the XMLHttpRequest object
Method:
1. open(): Creates a new request to the server.
2. send(): Sends a request to the server.
3. abort(): Exit the current request.
Attributes:
4. readyState: Provides the current state of the HTML.
5. responseText: The request-response text returned by the server.
程式碼一:
Code 1:
<script >
var request = new XMLHttpRequest();
request.open("GET", "ajaxr.html", true);
//這裡的 true 是指,非同步的意思。
// "true" means asynchronous
request.onreadystatechange = updatePage;
//這裡的 onreadystatechange是指,當頁面狀態改變時
// "onreadystatechange" means when the page status changes
request.send(null); //送出 //send
function updatePage()
{
alert(request.responseText);
}
</script>
c. 但是要加入一些判斷,程式才會完整
c. Add some determine to complete the application
程式碼二:修改 function的部分就好
Code2: Just modify the part of the function
function updatePage()
{
if (request.readyState == 4)
//這裡的 4 是指,HTTP 就緒狀態。(詳見下方PS2)
// 4 means HTTP ready status (Refer to the PS2 below)
{
if (request.status == 200)
//這裡的 200 是指,網頁讀取成功
// 200 means Web page read successfully
{
alert(request.responseText);
}
}
}
PS2:
在 Ajax 應用程式中需要瞭解五種 HTTP 就緒狀態:
0:請求沒有發出(在調用 open() 之前)。
1:請求已經建立但還沒有發出(調用 send() 之前)。
2:請求已經發出正在處理之中(這裡通常可以從回應得到內容標題部)。
3:請求已經處理,回應中通常有部分資料可用,但是伺服器還沒有完成回應。
4:回應已完成,可以訪問伺服器回應並使用它。
PS2:
There are five HTTP ready states to understand in an Ajax application:
0: The request was not issued (before calling open()).
1: The request has been established but has not yet been issued (before send() is called).
2: The request has been sent out of processing (here usually the content header section can be obtained from the response).
3: The request has been processed. Some data is usually available in the response, but the server has not completed the response.
4: The response is complete and you can access the server response and use it.
4. Ajax + JSP
a. 利用 AJAX 傳送二個值到後台,計算乘積之後再送回前台
a. Use AJAX to transfer two values to the background, calculate the product and send it back to the foreground.
程式碼 ajax002.jsp:前台
Code ajax002.jsp: front end
<script language="javascript" type="text/javascript">
var request = new XMLHttpRequest();
function calc()
//複製上面的程式,加上 function 承接下方按鈕的 onclick
/ / Copy the above program, plus function to accept the onclick button below
{
request.open("GET", "res.jsp?q1=" + document.getElementById('q1').value + "&q2=" + document.getElementById('q2').value, true);
request.onreadystatechange = updatePage;
request.send(null);
}
function updatePage()
{
if (request.readyState == 4)
{
if (request.status == 200)
{
document.getElementById('ans').innerHTML = request.responseText;
}
}
}
</script>
</head>
放二個空格相乘以及"="按鈕",並設一個 Span在後面
Multiply two spaces and "=" button" and set a Span behind
<body>
<form id="form1" name="form1" method="post" action="">
<label>
<input name="q1" type="text" id="q1" size="5" />
</label>
x
<label>
<input name="q2" type="text" id="q2" size="5" />
</label>
<input type="button" name="button" id="button" value="=" onclick="calc()"/>
<span id='ans'></span>
</form>
</body>
程式碼 res.jsp:後台
Code res.jsp: back end
<%@ page contentType="text/html; charset=utf-8" language="java" import="java.sql.*" errorPage="" %>
<%
int i, j;
i = Integer.parseInt(request.getParameter("q1"));
j = Integer.parseInt(request.getParameter("q2"));
out.print(i*j);
%>
執行結果:
Result:
JavaScript 3
1. JavaScript
a. Date 日期
程式碼:
<h1>今天是20120914</h1>
<script>
var now = new Date()
document.write('<b>現在時間 </b>' + now);
document.write('<br/>');
document.write('<b>取得年份 -- (year - 1900)</b> ' + now.getYear());
document.write('<br/>');
document.write('<b>取得月份 -- (一月 = 0 ~ 十二月 = 11)</b> ' + now.getMonth());
document.write('<br/>');
document.write('<b>取得日期 -- (取得一個月的一天)</b> ' + now.getDate());
</script>
Code: (English)
<h1>Today is 20120914</h1>
<script>
var now = new Date()
document.write('<b>Time Now </b>' + now);
document.write('<br/>');
document.write('<b>Get Year -- (year - 1900)</b> ' + now.getYear());
document.write('<br/>');
document.write('<b>Get Month -- (January = 0 ~ December = 11)</b> ' + now.getMonth());
document.write('<br/>');
document.write('<b>Get Date -- (Get a day of the month)</b> ' + now.getDate());
</script>
執行結果:
Result:
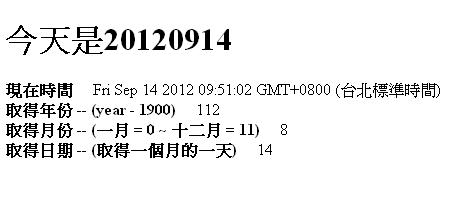 b. img + Array (自動換圖片)
B. Img + Array (automatically change pictures)
程式碼:
Code:
<script>
var imgs = Array('01.jpg', '02.jpg', '03.jpg', '04.jpg');
var i = 0;
function change()
{
i++;
if (i >= imgs.length)
i = 0;
document.getElementById('img1').src = imgs[i];
setTimeout('change()', 1000);
}
</script>
</head>
<body onload='change()'>
<img src="01.JPG" name="img1" width="196" height="151" id="img1" />
</body>
c. 用 navigator.userAgent + indexOf 判斷瀏覽器
c. Use navigator.userAgent + indexOf to determine the browser
程式碼:
Code:
<script>
var str = navigator.userAgent;
//取出 navigator.userAgent 的內容,放到 str 字串變數裡。
//Remove the contents of navigator.userAgent and put it in the str string variable.
if (str.indexOf('MSIE') > 0)
//判斷瀏覽器是否為 IE
// Determine whether the browser is IE
window.location = 'IE.html';
//將網頁導向 IE.html
// Redirect the page to IE.html
if (str.indexOf('Chrome') > 0)
//判斷瀏覽器是否為 Chrome
// Determine whether the browser is Chrome
window.location = 'chrome.html';
//將網頁導向 Chrome.html
// Redirect the page to Chrome.html
</script>
</head>
<body>
您的瀏覽器不是 IE 也不是 Chrome
Your browser is neither IE nor Chrome
</body>
d. 陣列 Array
程式碼一:用陣列做出二個相關聯的下拉選單
Code 1:Use the array to make two associated drop-down menus
<script>
var arr = new Array(3); //第一維陣列設3個 //The first dimension array has 3
var i;
for(i=0;i<=2;i++)
arr[i] = new Array(4);
arr[0][0] = '肉類';
arr[0][1] = '牛肉';
arr[0][2] = '豬肉';
arr[0][3] = '羊肉';
arr[1][0] = '水果';
arr[1][1] = '蘋果';
arr[1][2] = '葡萄';
arr[1][3] = '檸檬';
arr[2][0] = '飲料';
arr[2][1] = '可樂';
arr[2][2] = '汽水';
arr[2][3] = '果汁';
function chg(s1)
{
allclear(); //先清除 //Clear
for(i=1; i<=arr[ s1.selectedIndex -1].length-1 ; i++)
//當選擇 '肉類'時,s1.selectedIndex =1,所以 arr[ s1.selectedIndex -1 ]就是等於 arr[0]。 而 arr[0] 的 length = 4, length -1 = 3,指的是當選擇 '肉類'時,迴圈跑三次。
{
var opt = new Option( arr[s1.selectedIndex-1][i] , i);
//當選擇 '肉類',s1.selectedIndex - 1 就是 1 - 1 = 0。因為 selectedIndex = 0 是 '請選擇'
//且當 i=1 時,arr[s1.selectedIndex-1][i] 就是 arr[0][1],所以就是指 '牛肉'。
//且當 i=2 時,arr[s1.selectedIndex-1][i] 就是 arr[0][2],所以就是指 '豬肉'。
//且當 i=3 時,arr[s1.selectedIndex-1][i] 就是 arr[0][3],所以就是指 '羊肉'。
//當選擇 '水果',s1.selectedIndex - 1 就是 2 - 1 = 1。因為 selectedIndex = 0 是 '請選擇'
//且當 i=1 時,arr[s1.selectedIndex-1][i] 就是 arr[1][1],所以就是指 '蘋果'。
//且當 i=2 時,arr[s1.selectedIndex-1][i] 就是 arr[1][2],所以就是指 '葡萄'。
//且當 i=3 時,arr[s1.selectedIndex-1][i] 就是 arr[1][3],所以就是指 '檸檬'。
document.getElementById('s2').options.add(opt);
}
}
function allclear() //清除的語法
{
var i;
var newsel = document.getElementById('s2');
for (i=newsel.options.length-1; i>=0; i--)
{
newsel.options.remove(i);
}
}
</script>
</head>
<body>
<form id="form1" name="form1" method="post" action="">
<label>
<select name="s1" id="s1" onchange="chg(this)">
<option>請選擇</option>
</select>
</label>
<label>
<select name="s2" id="s2">
</select>
</label>
</form>
</body>
</html>
<script>
//HTML讀完後,先執行
//After the HTML is read, execute it first.
for (i=0;i<=2;i++)
{
var opt = new Option(arr[i][0], i);
//載入三種 s1:arr[0][0]、arr[1][0]、 arr[2][0]。
//Load three kinds of s1:arr[0][0], arr[1][0], arr[2][0]
document.getElementById('s1').options.add(opt);
}
</script>
執行結果:
Result:

PS:
在第二維陣列固定設長度為4,這樣不好。因為不能使用不同長度的第二維陣列。
建議第二維陣列不要有預設值,改成
arr[i] = new Array();
PS:
The length of the second dimension array is fixed at 4, which is not good. Because second-dimensional arrays of different lengths cannot be used. It is recommended that the second dimension array not have a preset value, change the code as follow
arr[i] = new Array();
程式碼二:不同長度的二維陣列,將水果加一樣,飲料加二樣
Code 2: Two-dimensional arrays of different lengths, add the same fruit, add the drink
<script>
var arr = new Array(3);
var i;
for(i=0;i<=2;i++)
arr[i] = new Array();
arr[0][0] = '肉類';
arr[0][1] = '牛肉';
arr[0][2] = '豬肉';
arr[0][3] = '羊肉';
arr[1][0] = '水果';
arr[1][1] = '蘋果';
arr[1][2] = '葡萄';
arr[1][3] = '檸檬';
arr[1][4] = '西瓜';
arr[2][0] = '飲料';
arr[2][1] = '可樂';
arr[2][2] = '汽水';
arr[2][3] = '果汁';
arr[2][4] = '奶茶';
arr[2][5] = '咖啡';
function chg(s1)
{
allclear();
for(i=1;i<=arr[s1.selectedIndex-1].length-1 ;i++)
{
var opt = new Option(arr[s1.selectedIndex-1][i], i);
document.getElementById('s2').options.add(opt);
}
}
function allclear()
{
var i;
var newsel = document.getElementById('s2');
for (i=newsel.options.length-1; i>=0; i--)
{
newsel.options.remove(i);
}
}
</script>
</head>
<body>
<form id="form1" name="form1" method="post" action="">
<label>
<select name="s1" id="s1" onchange="chg(this)">
<option>請選擇</option>
</select>
</label>
<label>
<select name="s2" id="s2">
</select>
</label>
</form>
</body>
</html>
<script>
for (i=0;i<=2;i++)
{
var opt = new Option(arr[i][0], i);
document.getElementById('s1').options.add(opt);
}
</script>
執行結果:
Result:

 e. 陣列排序
e. Array sorting
程式碼:
Code:
<script>
document.write('<h1>陣列由小到大排序 Array sorted from small to large</h1>');
var arr = new Array(5,2,6,1,7,2);
arr.sort(function(a,b){return b-a});
for (i=0;i<=5;i++)
{
document.write(arr[i]);
document.write('<br />');
}
document.write('<br />');
</script>
<script>
document.write('<h1>陣列由大到小排序 Array sorted from large to small</h1>');
var arr = new Array(5,2,6,1,7,2);
arr.sort(function(a,b){return b-a});
for (i=0;i<=5;i++)
{
document.write(arr[i]);
document.write('<br />');
}
</script>
執行結果:
Result:

a. Date 日期
程式碼:
<h1>今天是20120914</h1>
<script>
var now = new Date()
document.write('<b>現在時間 </b>' + now);
document.write('<br/>');
document.write('<b>取得年份 -- (year - 1900)</b> ' + now.getYear());
document.write('<br/>');
document.write('<b>取得月份 -- (一月 = 0 ~ 十二月 = 11)</b> ' + now.getMonth());
document.write('<br/>');
document.write('<b>取得日期 -- (取得一個月的一天)</b> ' + now.getDate());
</script>
Code: (English)
<h1>Today is 20120914</h1>
<script>
var now = new Date()
document.write('<b>Time Now </b>' + now);
document.write('<br/>');
document.write('<b>Get Year -- (year - 1900)</b> ' + now.getYear());
document.write('<br/>');
document.write('<b>Get Month -- (January = 0 ~ December = 11)</b> ' + now.getMonth());
document.write('<br/>');
document.write('<b>Get Date -- (Get a day of the month)</b> ' + now.getDate());
</script>
執行結果:
Result:

B. Img + Array (automatically change pictures)
程式碼:
Code:
<script>
var imgs = Array('01.jpg', '02.jpg', '03.jpg', '04.jpg');
var i = 0;
function change()
{
i++;
if (i >= imgs.length)
i = 0;
document.getElementById('img1').src = imgs[i];
setTimeout('change()', 1000);
}
</script>
</head>
<body onload='change()'>
<img src="01.JPG" name="img1" width="196" height="151" id="img1" />
</body>
c. 用 navigator.userAgent + indexOf 判斷瀏覽器
c. Use navigator.userAgent + indexOf to determine the browser
程式碼:
Code:
<script>
var str = navigator.userAgent;
//取出 navigator.userAgent 的內容,放到 str 字串變數裡。
//Remove the contents of navigator.userAgent and put it in the str string variable.
if (str.indexOf('MSIE') > 0)
//判斷瀏覽器是否為 IE
// Determine whether the browser is IE
window.location = 'IE.html';
//將網頁導向 IE.html
// Redirect the page to IE.html
if (str.indexOf('Chrome') > 0)
//判斷瀏覽器是否為 Chrome
// Determine whether the browser is Chrome
window.location = 'chrome.html';
//將網頁導向 Chrome.html
// Redirect the page to Chrome.html
</script>
</head>
<body>
您的瀏覽器不是 IE 也不是 Chrome
Your browser is neither IE nor Chrome
</body>
d. 陣列 Array
程式碼一:用陣列做出二個相關聯的下拉選單
Code 1:Use the array to make two associated drop-down menus
<script>
var arr = new Array(3); //第一維陣列設3個 //The first dimension array has 3
var i;
for(i=0;i<=2;i++)
arr[i] = new Array(4);
arr[0][0] = '肉類';
arr[0][1] = '牛肉';
arr[0][2] = '豬肉';
arr[0][3] = '羊肉';
arr[1][0] = '水果';
arr[1][1] = '蘋果';
arr[1][2] = '葡萄';
arr[1][3] = '檸檬';
arr[2][0] = '飲料';
arr[2][1] = '可樂';
arr[2][2] = '汽水';
arr[2][3] = '果汁';
function chg(s1)
{
allclear(); //先清除 //Clear
for(i=1; i<=arr[ s1.selectedIndex -1].length-1 ; i++)
//當選擇 '肉類'時,s1.selectedIndex =1,所以 arr[ s1.selectedIndex -1 ]就是等於 arr[0]。 而 arr[0] 的 length = 4, length -1 = 3,指的是當選擇 '肉類'時,迴圈跑三次。
{
var opt = new Option( arr[s1.selectedIndex-1][i] , i);
//當選擇 '肉類',s1.selectedIndex - 1 就是 1 - 1 = 0。因為 selectedIndex = 0 是 '請選擇'
//且當 i=1 時,arr[s1.selectedIndex-1][i] 就是 arr[0][1],所以就是指 '牛肉'。
//且當 i=2 時,arr[s1.selectedIndex-1][i] 就是 arr[0][2],所以就是指 '豬肉'。
//且當 i=3 時,arr[s1.selectedIndex-1][i] 就是 arr[0][3],所以就是指 '羊肉'。
//當選擇 '水果',s1.selectedIndex - 1 就是 2 - 1 = 1。因為 selectedIndex = 0 是 '請選擇'
//且當 i=1 時,arr[s1.selectedIndex-1][i] 就是 arr[1][1],所以就是指 '蘋果'。
//且當 i=2 時,arr[s1.selectedIndex-1][i] 就是 arr[1][2],所以就是指 '葡萄'。
//且當 i=3 時,arr[s1.selectedIndex-1][i] 就是 arr[1][3],所以就是指 '檸檬'。
document.getElementById('s2').options.add(opt);
}
}
function allclear() //清除的語法
{
var i;
var newsel = document.getElementById('s2');
for (i=newsel.options.length-1; i>=0; i--)
{
newsel.options.remove(i);
}
}
</script>
</head>
<body>
<form id="form1" name="form1" method="post" action="">
<label>
<select name="s1" id="s1" onchange="chg(this)">
<option>請選擇</option>
</select>
</label>
<label>
<select name="s2" id="s2">
</select>
</label>
</form>
</body>
</html>
<script>
//HTML讀完後,先執行
//After the HTML is read, execute it first.
for (i=0;i<=2;i++)
{
var opt = new Option(arr[i][0], i);
//載入三種 s1:arr[0][0]、arr[1][0]、 arr[2][0]。
//Load three kinds of s1:arr[0][0], arr[1][0], arr[2][0]
document.getElementById('s1').options.add(opt);
}
</script>
執行結果:
Result:
PS:
在第二維陣列固定設長度為4,這樣不好。因為不能使用不同長度的第二維陣列。
建議第二維陣列不要有預設值,改成
arr[i] = new Array();
PS:
The length of the second dimension array is fixed at 4, which is not good. Because second-dimensional arrays of different lengths cannot be used. It is recommended that the second dimension array not have a preset value, change the code as follow
arr[i] = new Array();
程式碼二:不同長度的二維陣列,將水果加一樣,飲料加二樣
Code 2: Two-dimensional arrays of different lengths, add the same fruit, add the drink
<script>
var arr = new Array(3);
var i;
for(i=0;i<=2;i++)
arr[i] = new Array();
arr[0][0] = '肉類';
arr[0][1] = '牛肉';
arr[0][2] = '豬肉';
arr[0][3] = '羊肉';
arr[1][0] = '水果';
arr[1][1] = '蘋果';
arr[1][2] = '葡萄';
arr[1][3] = '檸檬';
arr[1][4] = '西瓜';
arr[2][0] = '飲料';
arr[2][1] = '可樂';
arr[2][2] = '汽水';
arr[2][3] = '果汁';
arr[2][4] = '奶茶';
arr[2][5] = '咖啡';
function chg(s1)
{
allclear();
for(i=1;i<=arr[s1.selectedIndex-1].length-1 ;i++)
{
var opt = new Option(arr[s1.selectedIndex-1][i], i);
document.getElementById('s2').options.add(opt);
}
}
function allclear()
{
var i;
var newsel = document.getElementById('s2');
for (i=newsel.options.length-1; i>=0; i--)
{
newsel.options.remove(i);
}
}
</script>
</head>
<body>
<form id="form1" name="form1" method="post" action="">
<label>
<select name="s1" id="s1" onchange="chg(this)">
<option>請選擇</option>
</select>
</label>
<label>
<select name="s2" id="s2">
</select>
</label>
</form>
</body>
</html>
<script>
for (i=0;i<=2;i++)
{
var opt = new Option(arr[i][0], i);
document.getElementById('s1').options.add(opt);
}
</script>
執行結果:
Result:
e. Array sorting
程式碼:
Code:
<script>
document.write('<h1>陣列由小到大排序 Array sorted from small to large</h1>');
var arr = new Array(5,2,6,1,7,2);
arr.sort(function(a,b){return b-a});
for (i=0;i<=5;i++)
{
document.write(arr[i]);
document.write('<br />');
}
document.write('<br />');
</script>
<script>
document.write('<h1>陣列由大到小排序 Array sorted from large to small</h1>');
var arr = new Array(5,2,6,1,7,2);
arr.sort(function(a,b){return b-a});
for (i=0;i<=5;i++)
{
document.write(arr[i]);
document.write('<br />');
}
</script>
執行結果:
Result:

JavaScript 1
1. JavaScript -Basic
a. Hello World
The basic method is to put the JavaScript code in an HTML file. It makes the file is too long and hard to read. Here is an example to show you how to separate them. The advantage is the code is much clear when you read HTML or JavaScript and easily maintain the code because front end code and back end code are saved at 2 different files.
Example:
Open the application "notepad" (you can right click on the windows icon --> run --> type "notepad" --> enter). Type the code below then save as "001.html" (select save as type to "all files", and select Encoding as UTF-8)
If you create an HTML file by using Dreamweaver, then skip the process above.
CODE:
Insert the code below between <head> and </head> tag. The attribute "src" is to tell HTML that the JavaScript source code is located at another file called "hello.js". The file "hello.js" must be at the same directory as 001.html is.
CODE:
Then write the code below in the "hello.js" file, and save it.
CODE:
Now you can read "Hello World" when you open 001.html.
b. Basic structure: Object-Oriented - Basic
Nowadays, nobody uses " document.myform.mytext " any more. We use document.getElementById('mytext').value
Example:
Type any text you want in the textbox, then click the button. What you input will be displayed on the pop up alert.
CODE:
Result:
 Bonus:
If add one line in the previous code, then we can change change the background colour to yellow once you click the button. (use "Attribute" of JavaScript)
CODE:
e. Object:check "Required Field"
Using JavaScript to check required field in this example is not the best way to do security check, just for practice.
CODE:
Result:if enter nothing on the textbox, it will pop up a notification window.

d. Variable: Array
CODE:
Result:

e. One function can be used by multiple buttons
Example 1:click on button will add one
CODE:
Result:

Example 2:change the example 1 by using "this"
The letter "s" in the function is to represent "this" object (the button). Thus s.value is to take the value from the button object, the value is 0 at the beginning.
CODE:
PS:Add one line in the code, the s.id represents the id of the button.
CODE:
Result:

a. Hello World
The basic method is to put the JavaScript code in an HTML file. It makes the file is too long and hard to read. Here is an example to show you how to separate them. The advantage is the code is much clear when you read HTML or JavaScript and easily maintain the code because front end code and back end code are saved at 2 different files.
Example:
Open the application "notepad" (you can right click on the windows icon --> run --> type "notepad" --> enter). Type the code below then save as "001.html" (select save as type to "all files", and select Encoding as UTF-8)
If you create an HTML file by using Dreamweaver, then skip the process above.
CODE:
| <!DOCTYPE html> <html> <head> <meta charset="utf-8"> </head> <body> </body> </html> |
Insert the code below between <head> and </head> tag. The attribute "src" is to tell HTML that the JavaScript source code is located at another file called "hello.js". The file "hello.js" must be at the same directory as 001.html is.
CODE:
| <script language="JavaScript" src="hello.js"> </script> |
Then write the code below in the "hello.js" file, and save it.
CODE:
| document.write("Hello World"); |
Now you can read "Hello World" when you open 001.html.
b. Basic structure: Object-Oriented - Basic
Nowadays, nobody uses " document.myform.mytext " any more. We use document.getElementById('mytext').value
Example:
Type any text you want in the textbox, then click the button. What you input will be displayed on the pop up alert.
CODE:
| <head> <script> functionpop-up() { alert(document.getElementById('mytext').value); } </script> </head> <body> <form id="myform" name="myform" method="post" action=""> <label> <input type="text" name="mytext" id="mytext" /> </label> <input type="button" name="button" id="button" value="button" onclick="show()"/> </form> </body> |
Result:

If add one line in the previous code, then we can change change the background colour to yellow once you click the button. (use "Attribute" of JavaScript)
CODE:
| <script> function show () { alert(document.getElementById('mytext').value); document.bgColor="yellow"; } </script> |
e. Object:check "Required Field"
Using JavaScript to check required field in this example is not the best way to do security check, just for practice.
CODE:
| <!DOCTYPE html> <html> <head> <meta charset="utf-8"> <style type="text/css"> .star { font-weight: bolder; color: #F00; } </style> <script> function chk() { if (document.getElementById('username').value == '') { alert('please enter your account'); // alert('請輸入帳號'); return false; } else return true; } </script> </head> <body> <form id="form1" name="form1" method="post" action=""> <p>User Account <!-- <p>使用者帳號:--> <label> <input type="text" name="username" id="username" /> </label> <span class="star"> *</span></p> <p> <input type="submit" name="button" id="button" value="Submit" onclick="return chk()"/> </p> </form> </body> |
Result:if enter nothing on the textbox, it will pop up a notification window.

d. Variable: Array
CODE:
| <script> var fruits = new Array('A','B','C'); var i; for (i=0; i<fruits.length; i++) document.write(fruits[i] + '<br/>'); </script> |
Result:

e. One function can be used by multiple buttons
Example 1:click on button will add one
CODE:
| <head> <script> function add(s) { document.getElementById('button' +s).value = eval(document.getElementById('button' +s).value) + 1; } </script> </head> <body> <form id="form1" name="form1" method="post" action=""> <input type="button" name="button1" id="button1" value="0" onclick="add(1)"/> <br/> <input type="button" name="button2" id="button2" value="0" onclick="add(2)"/> <br/> <input type="button" name="button3" id="button3" value="0" onclick="add(3)"/> <br/> </form> </body> |
Result:
Example 2:change the example 1 by using "this"
The letter "s" in the function is to represent "this" object (the button). Thus s.value is to take the value from the button object, the value is 0 at the beginning.
CODE:
| <script> function add(s) { s.value = eval(s.value) + 1; } </script> </head> <body> <form id="form1" name="form1" method="post" action=""> <input type="button" name="button1" id="button1" value="0" onclick="add(this)"/> <br/> <input type="button" name="button2" id="button2" value="0" onclick="add(this)"/> <br/> <input type="button" name="button3" id="button3" value="0" onclick="add(this)"/> <br/> </form> </body> |
PS:Add one line in the code, the s.id represents the id of the button.
CODE:
| <script> function add(s) { s.value = eval(s.value) + 1; alert(s.id); } </script> |
Result:

JavaScript 2
2-1 JavaScript - Window
a. Pop up a Confirmation window
Example: When clicking on the hyperlink " Jump to 7.html", it hyperlinks a confirmation window.
CODE:
Result:
 b. prompt a textbox window
Example: Click on the button then pop up a window. You may type something in the textbox of the pop up window and click OK. Then the text you typed will appear under the button of the main page.
CODE:ENG
CODE:CHT
Result:
 PS:document.getElementById('myinput').innerHTML = str;
Explanation: Put str into a HTML tag which ID is 'myinput' . The " put ...into" means put str between <> and </> . In other word is put str between initial tag and finish tag.
這句話的意思是說:將 str 放到 id 叫做 'myinput' 的HTML標籤 "的裡面",所謂的裡面是指 <> 與 </> 之間,也就是 "起始標籤" 與 "結束標籤" 之間。
c. Set Timeout
Example: pop up a alert after 5 seconds
CODE:
Result:

d. Countdown download 1 - button
Example: To use the function setTimeout(), for other purpose. There is a counter appears at the main page starts to countdown 10 seconds. Once the times up, the counter becomes a button, Please click here. Then click the button, it will pop up another window says Hello. It usually uses as a download function on website.
CODE:ENG
CODE:CHT
Result:


e. Countdown download 2 - Hyperlink
Example: This is an extended application about the countdown download. It shows a countdown message which is different to the first one, a countdown button. When the time is up, it becomes a hyperlink. This is also very popular on many download websites.
CODE:CHT
Result:


2-2. JavaScript -- form
a. onchange VS onblur (Reference:JavaScript)
Example:
The alert pops up when type incorrect message, then return to the original text.
CODE:
b. checkbox 1
Example:
How to use select all
CODE:ENG
CODE:CHT
Result:


c. checkbox 2
Example:
The text will appear behind the checkbox you selected. You also can make the text appear at any place.
CODE:ENG
CODE:CHT
Result:

d. checkbox 3
2 layers checkbox. Once click OK then clear the selected data in the 2nd layer.
CODE:ENG
CODE:CHT
Result:


CODE:ENG
CODE:CHT
Result:

a. Pop up a Confirmation window
Example: When clicking on the hyperlink " Jump to 7.html", it hyperlinks a confirmation window.
CODE:
| <body> <a href="7.html" onclick="return confirm('確定連到 7.html');"> 連到 7.html</a> </body> |
Result:

Example: Click on the button then pop up a window. You may type something in the textbox of the pop up window and click OK. Then the text you typed will appear under the button of the main page.
| <!DOCTYPE html> <html> <head> <meta charset="utf-8"> <script> function go() { var str = prompt('Please type text', 'My text'); // The value 'My text' is as a default value if (str != null) document.getElementById('myinput').innerHTML = str; } </script> </head> <body> <form id="form1" name="form1" method="post" action=""> <p> <input type="button" name="button" id="button" value="button" onclick="go()" /> </p> <p><span id="myinput"></span></p> </form> </body> </html> |
CODE:CHT
| <!DOCTYPE html> <html> <head> <meta charset="utf-8"> <script> function go() { var str = prompt('請輸入字串', '我的字串'); // "我的字串" 在此為預設值 if (str != null) document.getElementById('myinput').innerHTML = str; } </script> </head> <body> <form id="form1" name="form1" method="post" action=""> <p> <input type="button" name="button" id="button" value="按鈕" onclick="go()" /> </p> <p><span id="myinput"></span></p> </form> </body> </html> |
Result:

Explanation: Put str into a HTML tag which ID is 'myinput' . The " put ...into" means put str between <> and </> . In other word is put str between initial tag and finish tag.
這句話的意思是說:將 str 放到 id 叫做 'myinput' 的HTML標籤 "的裡面",所謂的裡面是指 <> 與 </> 之間,也就是 "起始標籤" 與 "結束標籤" 之間。
c. Set Timeout
Example: pop up a alert after 5 seconds
CODE:
| <!DOCTYPE html> <html> <head> <meta charset="utf-8"> <script> setTimeout("alert('5 seconds has passed')" , 5000); // The second value 5000 milliseconds = 5 seconds. </script> </head> <body> An alert box will appear in 5 seconds </body> </html> |
Result:

d. Countdown download 1 - button
Example: To use the function setTimeout(), for other purpose. There is a counter appears at the main page starts to countdown 10 seconds. Once the times up, the counter becomes a button, Please click here. Then click the button, it will pop up another window says Hello. It usually uses as a download function on website.
CODE:ENG
| <!DOCTYPE html> <html> <head> <meta charset="utf-8"> </head> <script> var i = 10; function count() { if (i > 0) { document.getElementById('button1').value= i; i = i - 1; setTimeout("count()", 1000); } else { document.getElementById('button1').disabled= false; document.getElementById('button1').value= "Please click here"; } } </script> <body> <form id="form1" name="form1" method="post" action=""> <input type="button" name="button" id="button1" value="10" onclick="alert('Hello')"/> </form> </body> </html> <script> document.getElementById('button1').disabled= true; count(); </script> |
CODE:CHT
| <!DOCTYPE html> <html> <head> <meta charset="utf-8"> </head> <script> var i = 10; function count() { if (i > 0) { document.getElementById('button1').value= i; i = i - 1; setTimeout("count()", 1000); } else { document.getElementById('button1').disabled= false; document.getElementById('button1').value= "請按鈕"; } } </script> <body> <form id="form1" name="form1" method="post" action=""> <input type="button" name="button" id="button1" value="10" onclick="alert('Hello')"/> </form> </body> </html> <script> document.getElementById('button1').disabled= true; count(); </script> |
Result:

e. Countdown download 2 - Hyperlink
Example: This is an extended application about the countdown download. It shows a countdown message which is different to the first one, a countdown button. When the time is up, it becomes a hyperlink. This is also very popular on many download websites.
CODE:ENG
| <!DOCTYPE html> <html> <head> <meta charset="utf-8"> </head> <script> var i = 10; function count() { if (i > 0) { document.getElementById('dlmsg').innerHTML= "Please wait " + i + " seconds to download..."; i = i - 1; setTimeout("count()", 1000); } else { document.getElementById('dlmsg').innerHTML='<a href="001.html"> Click here download </a>'; } } </script> <body onload="count()"> <span id="dlmsg"></span> </body> </html> |
CODE:CHT
| <!DOCTYPE html> <html> <head> <meta charset="utf-8"> </head> <script> var i = 10; function count() { if (i > 0) { document.getElementById('dlmsg').innerHTML= "請稍等 " + i + " 秒後開始下載..."; i = i - 1; setTimeout("count()", 1000); } else { document.getElementById('dlmsg').innerHTML='<a href="001.html"> 請按此下載 </a>'; } } </script> <body onload="count()"> <span id="dlmsg"></span> </body> </html> |
Result:

2-2. JavaScript -- form
a. onchange VS onblur (Reference:JavaScript)
Example:
The alert pops up when type incorrect message, then return to the original text.
CODE:
| <!DOCTYPE html> <html> <head> <meta charset="utf-8"> </head> <body> <form id="form1" name="form1" method="post" action=""> <p> <label> <input type="text" name="mytext" id="mytext" onblur="alert('test');document.getElementById('mytext').focus();" /> </label> </p> <p> <label> <input type="text" name="textfield" id="textfield" /> </label> </p> </form> </body> </html> |
b. checkbox 1
Example:
How to use select all
CODE:ENG
| <!DOCTYPE html> <html> <head> <meta charset="utf-8"> </head> <script> function show() { var chk = document.getElementById('fruits1'); alert(chk.checked); } function checkall() { var i; for (i=1;i<=3;i++) document.getElementById('fruits' + i).checked = document.getElementById('chkall').checked; //checked is the attribute of the object. Which means the attribute of each fruit i will be the same attribute as the attribute of checked. } </script> </head> <body> <form id="form1" name="form1" method="post" action=""> <p> </p> <p> <label> <input type="checkbox" name="chkall" id="chkall" onclick="checkall()"/> Select All </label> </p> <p> <label> <input type="checkbox" name="fruits" id="fruits1" value="apple" />Apple </label> </p> <p> <label> <input type="checkbox" name="fruits" id="fruits2" value="banana" />Banana </label> </p> <p> <label> <input type="checkbox" name="fruits" id="fruits3" value="guava" />Guava </label> </p> <p> <input type="button" name="click" id="click" value="OK" onclick='show()'/> </p> </form> </body> </html> |
CODE:CHT
| <!DOCTYPE html> <html> <head> <meta charset="utf-8"> </head> <script> function show() { var chk = document.getElementById('fruits1'); alert(chk.checked); } function checkall() { var i; for (i=1;i<=3;i++) document.getElementById('fruits' + i).checked = document.getElementById('chkall').checked; //checked的意思是該物件的屬性。也就是每個 fruits i 的屬性,都會跟 'chkall'的 checked屬性一樣。 } </script> </head> <body> <form id="form1" name="form1" method="post" action=""> <p> </p> <p> <label> <input type="checkbox" name="chkall" id="chkall" onclick="checkall()"/> 全選 </label> </p> <p> <label> <input type="checkbox" name="fruits" id="fruits1" value="apple" />蘋果 </label> </p> <p> <label> <input type="checkbox" name="fruits" id="fruits2" value="banana" />香蕉 </label> </p> <p> <label> <input type="checkbox" name="fruits" id="fruits3" value="guava" />芭樂 </label> </p> <p> <input type="button" name="click" id="click" value="按鈕" onclick='show()'/> </p> </form> </body> </html> |
Result:
c. checkbox 2
Example:
The text will appear behind the checkbox you selected. You also can make the text appear at any place.
CODE:ENG
| <!DOCTYPE html> <html> <head> <meta charset="utf-8"> <script> function show(sel) { var i; for (i=1;i<sel.length;i++) { if (sel.options[i].selected) document.getElementById('seltext').innerHTML = sel.options[i].value; } } </script> </head> <body> <form id="form1" name="form1" method="post" action=""> <label> <select name="fruits" id="fruits" onchange="show(this)"> <option>Please select</option> <option value="Apple">Apple</option> <option value="Banana">Banana</option> <option value="Orange">Orange</option> </select> </label> <span id="seltext"></span> </form> </body> </html> |
CODE:CHT
| <!DOCTYPE html> <html> <head> <meta charset="utf-8"> <script> function show(sel) { var i; for (i=1;i<sel.length;i++) { if (sel.options[i].selected) document.getElementById('seltext').innerHTML = sel.options[i].value; } } </script> </head> <body> <form id="form1" name="form1" method="post" action=""> <label> <select name="fruits" id="fruits" onchange="show(this)"> <option>請選擇</option> <option value="蘋果">蘋果</option> <option value="香蕉">香蕉</option> <option value="柳橙">柳橙</option> </select> </label> <span id="seltext"></span> </form> </body> </html> |
Result:
d. checkbox 3
2 layers checkbox. Once click OK then clear the selected data in the 2nd layer.
CODE:ENG
| <!DOCTYPE html> <html> <head> <meta charset="utf-8"> <script> function chg(mycat) { var i; var s; allclear(); for (i=1;i<mycat.length;i++) { if (mycat.options[i].selected == true) s = i; } var newsel = document.getElementById('sel2'); if (s == 1) { var opt = new Option('Apple', 'Apple'); newsel.options.add(opt); opt = new Option('Banana', 'Banana'); newsel.options.add(opt); opt = new Option('Orange', 'Orange'); newsel.options.add(opt); } else if (s == 2) { var opt = new Option('Cola', 'Cola'); newsel.options.add(opt); opt = new Option('Soda', 'Soda'); newsel.options.add(opt); opt = new Option('Juice', 'Juice'); newsel.options.add(opt); } } function allclear() { var i; var newsel = document.getElementById('sel2'); for (i=newsel.options.length-1; i>=0; i--) { newsel.options.remove(i); } } </script> </head> <body> <form id="form1" name="form1" method="post" action=""> <p> <label> <select name="sel1" id="sel1" onchange="chg(this)"> <option>Select</option> <option value="1">Fruit</option> <option value="2">Beverages</option> </select> </label> <label> <select name="sel2" id="sel2"> </select> </label> </p> <p> <input type="button" name="button" id="button" value="OK" onclick="allclear()"/> </p> </form> </body> </html> |
CODE:CHT
| <!DOCTYPE html> <html> <head> <meta charset="utf-8"> <script> function chg(mycat) { var i; var s; allclear(); for (i=1;i<mycat.length;i++) { if (mycat.options[i].selected == true) s = i; } var newsel = document.getElementById('sel2'); if (s == 1) { var opt = new Option('蘋果', '蘋果'); newsel.options.add(opt); opt = new Option('香蕉', '香蕉'); newsel.options.add(opt); opt = new Option('柳橙', '柳橙'); newsel.options.add(opt); } else if (s == 2) { var opt = new Option('可樂', '可樂'); newsel.options.add(opt); opt = new Option('汽水', '汽水'); newsel.options.add(opt); opt = new Option('果汁', '果汁'); newsel.options.add(opt); } } function allclear() { var i; var newsel = document.getElementById('sel2'); for (i=newsel.options.length-1; i>=0; i--) { newsel.options.remove(i); } } </script> </head> <body> <form id="form1" name="form1" method="post" action=""> <p> <label> <select name="sel1" id="sel1" onchange="chg(this)"> <option>請選擇</option> <option value="1">水果</option> <option value="2">飲料</option> </select> </label> <label> <select name="sel2" id="sel2"> </select> </label> </p> <p> <input type="button" name="button" id="button" value="按鈕" onclick="allclear()"/> </p> </form> </body> </html> |
Result:
e. checkbox 4
Don't need to click the "OK" button once you have selected the checkbox.| <!DOCTYPE html> <html> <head> <meta charset="utf-8"> </head> <body>
<form id="form1" name="form1" method="get" action="">
<p>
<label>
<select name="page" id="page" onchange="document.getElementById('form1').submit();">
<option>Select page</option>
<option value="1">Page 1</option>
<option value="2">Page 2</option>
<option value="3">Page 3</option>
<option value="4">Page 4</option>
</select>
</label>
</p>
<p>
<input type="submit" name="button" id="button" value="Submit" />
</p>
</form>
</body>
</html> |
CODE:CHT
| <!DOCTYPE html> <html> <head> <meta charset="utf-8"> </head> <body>
<form id="form1" name="form1" method="get" action="">
<p>
<label>
<select name="page" id="page" onchange="document.getElementById('form1').submit();">
<option>選擇頁數</option><option value="1">第1頁</option> <option value="2">第2頁</option> <option value="3">第3頁</option> <option value="4">第4頁</option>
</select>
</label>
</p>
<p> <input type="submit" name="button" id="button" value="送出" />
</p>
</form>
</body>
</html>
|
Result:

Review
So sometimes you can use the combination of checkbox 4 + checkbox 3 to be your website function or use other different combinations to be a possibility.
Subscribe to:
Posts (Atom)