考試
1.安裝 VM Ware
2.安裝 Apache + My SQL(Appserv)
3.安裝 Tomcat
4.安裝 Java JDK (7.0)
5.設定環境變數
path
CLASSPATH
JAVA_HOME
CATANINA_HOME。
6.建立資料庫、資料表、輸入資料
7.撰寫程式
a. 設定 JDBC (將xxxxx.jar 路徑匯入)
b. 撰寫 SQL connnection
c. 必須包含下列功能:
1.session
2.select
3.insert
4.update
5.delete
8.進階加分
a. servelt
b. JavaBean
c. 安裝 Linux
Showing posts with label J2EE. Show all posts
Showing posts with label J2EE. Show all posts

J2EE Part 22
1.
課本 JSP 2.0 的第18章 -- AJAX
a.課本 p.18-3頁, XmlHttpRequest 物件是由瀏覽器所提供,不是 Java 提供,所以不同瀏覽器,可能要用不同的語法,來產生相同的結果。在不同瀏覽器使用相同的語法,也有可能
課本範例程式:ch18/ex18-1/sendHttp.htm
<HTML>
<Script language="JavaScript">
function sendHttp()
{
try{
xmlHttp = new ActiveXObject("Msxml2.XMLHTTP");
//只有 IE 可以用
}catch ( e ){
xmlHttp = new XMLHttpRequest();
//其他瀏覽器用這個
}
//alert(xmlHttp);
//STEP 1 建立HttpRequest物件
//alert(url.value);
xmlHttp.open("GET", url.value, false);
//STEP 2 開啟HTTP連結
xmlHttp.send() ;
//STEP 3 送出HttpRequest物件的請求
//STEP 4、STEP 5 執行於伺服端的ASP網頁
//STEP 6 利用XMLHttp物件的屬性與方法,取得伺服端回應的資料
//statuscode.innerText = xmlHttp.status;
if (!document.getElementById('statuscode').hasChildNodes()) {
document.getElementById('statuscode').appendChild(document.createTextNode('.'));
}
document.getElementById('statuscode').firstChild.nodeValue = xmlHttp.status;
//取得回應狀態
//statustext.innerText = xmlHttp.statusText;
if (!document.getElementById('statustext').hasChildNodes()) {
document.getElementById('statustext').appendChild(document.createTextNode('.'));
}
document.getElementById('statustext').firstChild.nodeValue = xmlHttp.statusText;
//取得回應訊息
//repText.innerText = xmlHttp.responseText;
if (!document.getElementById('repText').hasChildNodes()) {
document.getElementById('repText').appendChild(document.createTextNode('.'));
}
document.getElementById('repText').firstChild.nodeValue = xmlHttp.responseText;
//取得回應的內容
}
</Script>
<BODY>
<Center>
<H1><Font color="blue">HTTP連結的建立與回應訊息的取得</Font></H1><HR>
請輸入測試位址 :
<Input type=text value="responseHttp.jsp" id=url>
<Input type=button onclick="sendHttp()" value="取得回應"><P></P>
<Table bgcolor="DodgerBlue" width=90%>
<tr>
<td bgcolor="SkyBlue" width=15%><B>狀態編碼</B></td>
<td bgcolor="Wheat" width=85%><Span id=statuscode></Span></td>
</tr>
<tr>
<td bgcolor="SkyBlue" width=15%><B>狀態訊息</B></td>
<td bgcolor="Wheat" width=85%><Span id=statustext></Span></td>
</tr>
<tr>
<td bgcolor="SkyBlue"><B>回應內容</B></td>
<td bgcolor="Wheat"><SPAN id=repText></SPAN></td>
</tr>
</Table>
</Center>
</BODY>
</HTML>
responseHttp.jsp
<%
out.print(request.getHeaderNames());
%>
2.插播 web 應用程式 scope
web 應用程式 scope:有效範圍
application:網頁伺服器關閉
session:該次連線(瀏覽器關閉)
page:該網頁有效,下一個網頁無效(要用 get, post 將參數傳到下一個網頁)
request:該需求有效
J2EE Part 21
1.課本 JSP 2.0 的第14章 -- JavaBean
課本範例:personData.java
package com.bitc.example;
//定義Bean所屬的套件
import java.io.*;
//欲儲存的Bean物件必須實做Serializable介面
public class PersonData implements Serializable
{
//Bean屬性
private String Name = "";
private int age = 0;
public PersonData() //建構子
{
}
//以下為設定Bean屬性的方法
public void setUserName(String name)
{ this.Name = name; }
public void setAge(int age)
{ this.age = age; }
//以下為取得Bean屬性的方法
public String getUserName()
{ return this.Name; }
public int getAge()
{ return this.age; }
}
課本範例:UseBean.jsp
<%@ page contentType="text/html; charset=Big5" %>
<HTML>
<HEAD>
<TITLE>使用Beans</TITLE>
</HEAD>
<BODY>
<CENTER>
<FONT SIZE = 5 COLOR = blue>使用Beans</FONT>
</CENTER>
<HR>
<P></P>
<H2>
<jsp:useBean id="person" scope="application"
class="com.bitc.example.PersonData"/>
<jsp:setProperty name="person"
property="userName" value="郭尚君"/>
<%
person.setAge(30); //呼叫Bean物件的方法, 設定屬性
%>
<Font color = red>userName</Font>屬性值為
<Font color = blue>
<jsp:getProperty name="person" property="userName"/>
</Font><BR>
<Font color = red>age</Font>屬性值為
<Font color = blue>
<%--以呼叫Bean物件方法的方式取得屬性--%>
<%= person.getAge() %></Font>
</BODY>
</HTML>
結果:

課本範例:personData.java
package com.bitc.example;
//定義Bean所屬的套件
import java.io.*;
//欲儲存的Bean物件必須實做Serializable介面
public class PersonData implements Serializable
{
//Bean屬性
private String Name = "";
private int age = 0;
public PersonData() //建構子
{
}
//以下為設定Bean屬性的方法
public void setUserName(String name)
{ this.Name = name; }
public void setAge(int age)
{ this.age = age; }
//以下為取得Bean屬性的方法
public String getUserName()
{ return this.Name; }
public int getAge()
{ return this.age; }
}
課本範例:UseBean.jsp
<%@ page contentType="text/html; charset=Big5" %>
<HTML>
<HEAD>
<TITLE>使用Beans</TITLE>
</HEAD>
<BODY>
<CENTER>
<FONT SIZE = 5 COLOR = blue>使用Beans</FONT>
</CENTER>
<HR>
<P></P>
<H2>
<jsp:useBean id="person" scope="application"
class="com.bitc.example.PersonData"/>
<jsp:setProperty name="person"
property="userName" value="郭尚君"/>
<%
person.setAge(30); //呼叫Bean物件的方法, 設定屬性
%>
<Font color = red>userName</Font>屬性值為
<Font color = blue>
<jsp:getProperty name="person" property="userName"/>
</Font><BR>
<Font color = red>age</Font>屬性值為
<Font color = blue>
<%--以呼叫Bean物件方法的方式取得屬性--%>
<%= person.getAge() %></Font>
</BODY>
</HTML>
結果:

J2EE Part 20
1. 課本 JSP 2.0 的第17章 -- XML
課本範例:book.xml
<?xml version='1.0' encoding='Big5'?>
<books>
<book><name>Visual C++ .NET 入門進階</name><date>2009-10-5</date><price>650</price></book>
<book><name>精通視窗程式設計</name><date>2009-7-15</date><price>790</price></book>
<book><name>Access 2007 徹底研究</name><date>2008-8-1</date><price>650</price></book>
<book><name>Access 2007 程式設計</name><date>2008-11-21</date><price>690</price></book>
<book><name>XML技術實務</name><date>2009-4-15</date><price>720</price></book>
</books>
課本範例:getXML.jsp
<%@ page contentType="text/html; charset=Big5"%>
<%@ page import="javax.xml.parsers.DocumentBuilderFactory,
javax.xml.parsers.DocumentBuilder,
org.w3c.dom.*"%>
<%
Document BookDOM = null;
String File = request.getRealPath("/") + "ex17-1\\book.xml";
//取得XML文件的儲存路徑與檔名,使用Resin伺服器可改成
//String File = request.getRealPath(".") + "book.xml";
DocumentBuilderFactory factory = DocumentBuilderFactory.newInstance();
//STEP 1、建立DocumentBoulderFactory的實體
try{
DocumentBuilder builder = factory.newDocumentBuilder();
//STEP 2、以DocumentBoulderFactory物件建立DocumentBuilder的實體
BookDOM = builder.parse(File);
// STEP 3、呼叫parse方法傳入XML文件的路徑與名稱
//,執行剖析取得Document物件
}
catch(Exception e){
out.println("XML文件剖析錯誤 : " + e.getMessage());
}
%>
<HTML>
<HEAD>
<TITLE>取得XML文件並輸出為HTML文件</TITLE>
</HEAD>
<BODY>
<CENTER>
<FONT SIZE = 5 COLOR = blue>取得XML文件並輸出為HTML文件</FONT>
</CENTER>
<HR>
<%
NodeList bookList = BookDOM.getElementsByTagName("book");
//取得根元素下包含所有books元素節點的節點集
%>
<P></P></CENTER>
<TABLE bgcolor=DodgerBlue width=80% align=center>
<TR bgcolor=SkyBlue>
<TD><B>書名</B></TD><TD><B>出版日期</B></TD><TD><B>價格</B></TD>
</TR>
<%
String Color;
for(int i=0; i<bookList.getLength(); i++){
Node curNode = bookList.item(i); //取得節點集包含的節點
NodeList detail = curNode.getChildNodes();
//取得節點所包含子節點的節點集,將包含name、date與price節點
out.print("<TR>");
//取得節點集的長度,並配合for迴圈,輸出節點集的值
for(int j=0; j<detail.getLength(); j++){
if (j % 2 == 0)
Color = "Wheat";
else
Color = "LightGoldenrodYellow";
%>
<TD bgcolor= <%= Color %> ><B>
<%= detail.item(j).getChildNodes().item(0).getNodeValue() %>
<%--先呼叫item(j)方法取得detail節點集內的name、date與price節點,
再呼叫getChildNodes方法取得上述節點的節點集,
以item(0)取得第一個節點,該節點為包含節點值的文字節點,
再呼叫getNodeValue方法取得文字節點之值
--%>
</B></TD>
<%
}
out.print("</TR>");
}
%>
</TABLE>
</BODY>
</HTML>
2. 課本 JSP 2.0 的第3章 -- JavaScript
課本範例:ClientProg.htm
<HTML>
<HEAD>
<TITLE>在客戶端執行的程式</TITLE>
</HEAD>
<BODY>
<CENTER>
<FONT SIZE = 5 COLOR = blue>在客戶端執行的程式</FONT>
</CENTER>
<HR>
<P></P>
<SCRIPT Language = javascript>
<!--
function ShowTime()
{
alert("現在時間是" + new Date());
//呼叫window物件的alert方法顯示系統時間
}
-->
</SCRIPT>
<INPUT type="button" value="現在時間" name=button1 onclick = "ShowTime()">
</BODY>
</HTML>
老師範例:index.htm
<html>
<head>
</head>
<body>
//直接用下面的語法,可代替上面的語法
<button onClick='javascript: alert("真乖!")'> 按我 </button>
<img src='./apple.jpg' onClick='javascript: alert("別亂摸!")'>
<a onClick='javascript: alert(" 吼! ..... 喵!")'>獅子</a>
</body>
</html>
3.JavaScript 老師補充
老師範例:四星彩
FourStar_javascript\FourStar.htm
<html>
<head>
<meta http-equiv="Content-Type" content="text/html; charset=UTF-8">
<title>四星彩</title>
</head>
<body>
<script language='javascript'>
document.write("四星彩開獎了: ");
for ( i=0; i<4; i++){
document.write("<img src='./image/");
document.write( Math.floor(Math.random()*10) );
document.write(".JPG'>");
}
</script>
</body>
</html>
老師範例:樂透彩
Lottery_javascript\lottery.htm
<html>
<head>
<meta http-equiv="Content-Type" content="text/html; charset=UTF-8">
<title>樂透彩</title>
</head>
<body>
<script language='javascript'>
document.write("樂透彩開獎了: ");
balls = new Array(7);
for ( i=0; i<balls.length; i++){
balls[i] = Math.floor(Math.random()*49+1);
//檢查是否重複
for ( j=0; j<i; j++){
if ( balls[i] == balls[j] ){
i--;
break;
}
}
}
//排序
for ( i=0; i<balls.length-2; i++){
if ( balls[i] > balls[i+1] ){
t = balls[i];
balls[i] = balls[i+1];
balls[i+1] =t;
i=-1;
}
}
//顯示
for ( i=0; i<balls.length; i++){
document.write(balls[i] +", ");
}
</script>
</body>
</html>
結果:

課本範例:book.xml
<?xml version='1.0' encoding='Big5'?>
<books>
<book><name>Visual C++ .NET 入門進階</name><date>2009-10-5</date><price>650</price></book>
<book><name>精通視窗程式設計</name><date>2009-7-15</date><price>790</price></book>
<book><name>Access 2007 徹底研究</name><date>2008-8-1</date><price>650</price></book>
<book><name>Access 2007 程式設計</name><date>2008-11-21</date><price>690</price></book>
<book><name>XML技術實務</name><date>2009-4-15</date><price>720</price></book>
</books>
課本範例:getXML.jsp
<%@ page contentType="text/html; charset=Big5"%>
<%@ page import="javax.xml.parsers.DocumentBuilderFactory,
javax.xml.parsers.DocumentBuilder,
org.w3c.dom.*"%>
<%
Document BookDOM = null;
String File = request.getRealPath("/") + "ex17-1\\book.xml";
//取得XML文件的儲存路徑與檔名,使用Resin伺服器可改成
//String File = request.getRealPath(".") + "book.xml";
DocumentBuilderFactory factory = DocumentBuilderFactory.newInstance();
//STEP 1、建立DocumentBoulderFactory的實體
try{
DocumentBuilder builder = factory.newDocumentBuilder();
//STEP 2、以DocumentBoulderFactory物件建立DocumentBuilder的實體
BookDOM = builder.parse(File);
// STEP 3、呼叫parse方法傳入XML文件的路徑與名稱
//,執行剖析取得Document物件
}
catch(Exception e){
out.println("XML文件剖析錯誤 : " + e.getMessage());
}
%>
<HTML>
<HEAD>
<TITLE>取得XML文件並輸出為HTML文件</TITLE>
</HEAD>
<BODY>
<CENTER>
<FONT SIZE = 5 COLOR = blue>取得XML文件並輸出為HTML文件</FONT>
</CENTER>
<HR>
<%
NodeList bookList = BookDOM.getElementsByTagName("book");
//取得根元素下包含所有books元素節點的節點集
%>
<P></P></CENTER>
<TABLE bgcolor=DodgerBlue width=80% align=center>
<TR bgcolor=SkyBlue>
<TD><B>書名</B></TD><TD><B>出版日期</B></TD><TD><B>價格</B></TD>
</TR>
<%
String Color;
for(int i=0; i<bookList.getLength(); i++){
Node curNode = bookList.item(i); //取得節點集包含的節點
NodeList detail = curNode.getChildNodes();
//取得節點所包含子節點的節點集,將包含name、date與price節點
out.print("<TR>");
//取得節點集的長度,並配合for迴圈,輸出節點集的值
for(int j=0; j<detail.getLength(); j++){
if (j % 2 == 0)
Color = "Wheat";
else
Color = "LightGoldenrodYellow";
%>
<TD bgcolor= <%= Color %> ><B>
<%= detail.item(j).getChildNodes().item(0).getNodeValue() %>
<%--先呼叫item(j)方法取得detail節點集內的name、date與price節點,
再呼叫getChildNodes方法取得上述節點的節點集,
以item(0)取得第一個節點,該節點為包含節點值的文字節點,
再呼叫getNodeValue方法取得文字節點之值
--%>
</B></TD>
<%
}
out.print("</TR>");
}
%>
</TABLE>
</BODY>
</HTML>
2. 課本 JSP 2.0 的第3章 -- JavaScript
課本範例:ClientProg.htm
<HTML>
<HEAD>
<TITLE>在客戶端執行的程式</TITLE>
</HEAD>
<BODY>
<CENTER>
<FONT SIZE = 5 COLOR = blue>在客戶端執行的程式</FONT>
</CENTER>
<HR>
<P></P>
<SCRIPT Language = javascript>
<!--
function ShowTime()
{
alert("現在時間是" + new Date());
//呼叫window物件的alert方法顯示系統時間
}
-->
</SCRIPT>
<INPUT type="button" value="現在時間" name=button1 onclick = "ShowTime()">
</BODY>
</HTML>
老師範例:index.htm
<html>
<head>
</head>
<body>
//直接用下面的語法,可代替上面的語法
<button onClick='javascript: alert("真乖!")'> 按我 </button>
<img src='./apple.jpg' onClick='javascript: alert("別亂摸!")'>
<a onClick='javascript: alert(" 吼! ..... 喵!")'>獅子</a>
</body>
</html>
3.JavaScript 老師補充
老師範例:四星彩
FourStar_javascript\FourStar.htm
<html>
<head>
<meta http-equiv="Content-Type" content="text/html; charset=UTF-8">
<title>四星彩</title>
</head>
<body>
<script language='javascript'>
document.write("四星彩開獎了: ");
for ( i=0; i<4; i++){
document.write("<img src='./image/");
document.write( Math.floor(Math.random()*10) );
document.write(".JPG'>");
}
</script>
</body>
</html>
老師範例:樂透彩
Lottery_javascript\lottery.htm
<html>
<head>
<meta http-equiv="Content-Type" content="text/html; charset=UTF-8">
<title>樂透彩</title>
</head>
<body>
<script language='javascript'>
document.write("樂透彩開獎了: ");
balls = new Array(7);
for ( i=0; i<balls.length; i++){
balls[i] = Math.floor(Math.random()*49+1);
//檢查是否重複
for ( j=0; j<i; j++){
if ( balls[i] == balls[j] ){
i--;
break;
}
}
}
//排序
for ( i=0; i<balls.length-2; i++){
if ( balls[i] > balls[i+1] ){
t = balls[i];
balls[i] = balls[i+1];
balls[i+1] =t;
i=-1;
}
}
//顯示
for ( i=0; i<balls.length; i++){
document.write(balls[i] +", ");
}
</script>
</body>
</html>
結果:

J2EE Part 19
1.Java 2 第24章 -- JDBC
a.修改 CLASSPATH,加一筆路徑
;%JAVA_HOME%\db\lib\derby.jar;
b.編譯並執行程式
程式碼:
Samplea.java
import java.sql.*;
public class Sample1
{
public static void main(String args[])
{
try{
// 準備連線
String url = "jdbc:derby:cardb;create=true";
String usr = "";
String pw = "";
// 連接到資料庫
Connection cn = DriverManager.getConnection(url, usr, pw);
// 準備查詢
DatabaseMetaData dm = cn.getMetaData();
ResultSet tb = dm.getTables(null, null, "車子資料表", null);
Statement st = cn.createStatement();
String qry1 = "CREATE TABLE 車子資料表(編號 int, 名稱 varchar(50))";
String[] qry2 = {"INSERT INTO 車子資料表 VALUES (2, '汽車')",
"INSERT INTO 車子資料表 VALUES (3, '戰車')",
"INSERT INTO 車子資料表 VALUES (4, '卡車')"};
String qry3 = "SELECT * FROM 車子資料表";
if(!tb.next()){
st.executeUpdate(qry1);
for(int i=0; i<qry2.length; i++){
st.executeUpdate(qry2[i]);
}
}
// 進行查詢
ResultSet rs = st.executeQuery(qry3);
// 取得資料
ResultSetMetaData rm = rs.getMetaData();
int cnum = rm.getColumnCount();
while(rs.next()){
for(int i=1; i<=cnum; i++){
System.out.print(rm.getColumnName(i) + ":"+ rs.getObject(i) + " ");
}
System.out.println("");
}
// 關閉連線
rs.close();
st.close();
cn.close();
}
catch(Exception e){
e.printStackTrace();
}
}
}
run.bat
javac Sample1.java
java Sample
pause
結果:

PS:JAVA 與 資料庫連線
一般分為
1.非微軟相關資料來源:My SQL、等等。
用法:JDBC 即可
例如:
String strSQL = "SELECT * FROM employee where e_name = '" + act + "'";
ResultSet rs = stmt.executeQuery(strSQL);
2.與微軟相關之資料來源:文字檔、Excel、Access、MS SQL 等。
用法:必須使用 JDBC -- ODBC
例如:
// 1. 載入JDBC/ODBC驅動程式
Class.forName("sun.jdbc.odbc.JdbcOdbcDriver");
// 2. 傳回資料庫連線物件 (這裡的 bookbase 是 ODBC 之資料來源的名稱)
Connection con = DriverManager.getConnection("jdbc:odbc:bookbase");
// 3. 建立 statment 物件
Statement stmt = con.createStatement();
// 4. 執行 SQL 指令
ResultSet rs=stmt.executeQuery("select * from bookTab");
2.Java 2 第26章 -- XML
a. XML 主要最為資料傳輸與轉換用,例如:由 A 系統 (或是 A 公司)取出資料,轉成 A、B
雙方共同制定的 XML 格式,再由 B 系統 (或是 B 公司) 接收 XML檔案後,轉成所要的資料格式,匯入 B 系統 (或是 B 公司) 。
b. 利用 DOM、XSL、XSLT等不同的工具檔案,可將XML、資料庫的資料等轉換出來,並加入所需要的條件來篩選。所得出所要的簡潔資料。而不會只是將資料 Copy。
a.修改 CLASSPATH,加一筆路徑
;%JAVA_HOME%\db\lib\derby.jar;
b.編譯並執行程式
程式碼:
Samplea.java
import java.sql.*;
public class Sample1
{
public static void main(String args[])
{
try{
// 準備連線
String url = "jdbc:derby:cardb;create=true";
String usr = "";
String pw = "";
// 連接到資料庫
Connection cn = DriverManager.getConnection(url, usr, pw);
// 準備查詢
DatabaseMetaData dm = cn.getMetaData();
ResultSet tb = dm.getTables(null, null, "車子資料表", null);
Statement st = cn.createStatement();
String qry1 = "CREATE TABLE 車子資料表(編號 int, 名稱 varchar(50))";
String[] qry2 = {"INSERT INTO 車子資料表 VALUES (2, '汽車')",
"INSERT INTO 車子資料表 VALUES (3, '戰車')",
"INSERT INTO 車子資料表 VALUES (4, '卡車')"};
String qry3 = "SELECT * FROM 車子資料表";
if(!tb.next()){
st.executeUpdate(qry1);
for(int i=0; i<qry2.length; i++){
st.executeUpdate(qry2[i]);
}
}
// 進行查詢
ResultSet rs = st.executeQuery(qry3);
// 取得資料
ResultSetMetaData rm = rs.getMetaData();
int cnum = rm.getColumnCount();
while(rs.next()){
for(int i=1; i<=cnum; i++){
System.out.print(rm.getColumnName(i) + ":"+ rs.getObject(i) + " ");
}
System.out.println("");
}
// 關閉連線
rs.close();
st.close();
cn.close();
}
catch(Exception e){
e.printStackTrace();
}
}
}
run.bat
javac Sample1.java
java Sample
pause
結果:

PS:JAVA 與 資料庫連線
一般分為
1.非微軟相關資料來源:My SQL、等等。
用法:JDBC 即可
例如:
Class.forName("com.mysql.jdbc.Driver");
String url = "jdbc:mysql://localhost:3306/company?user=root&password=apple&charset=utf8";
Connection con = DriverManager.getConnection(url);
Statement stmt = con.createStatement();String strSQL = "SELECT * FROM employee where e_name = '" + act + "'";
ResultSet rs = stmt.executeQuery(strSQL);
2.與微軟相關之資料來源:文字檔、Excel、Access、MS SQL 等。
用法:必須使用 JDBC -- ODBC
例如:
// 1. 載入JDBC/ODBC驅動程式
Class.forName("sun.jdbc.odbc.JdbcOdbcDriver");
// 2. 傳回資料庫連線物件 (這裡的 bookbase 是 ODBC 之資料來源的名稱)
Connection con = DriverManager.getConnection("jdbc:odbc:bookbase");
// 3. 建立 statment 物件
Statement stmt = con.createStatement();
// 4. 執行 SQL 指令
ResultSet rs=stmt.executeQuery("select * from bookTab");
2.Java 2 第26章 -- XML
a. XML 主要最為資料傳輸與轉換用,例如:由 A 系統 (或是 A 公司)取出資料,轉成 A、B
雙方共同制定的 XML 格式,再由 B 系統 (或是 B 公司) 接收 XML檔案後,轉成所要的資料格式,匯入 B 系統 (或是 B 公司) 。
b. 利用 DOM、XSL、XSLT等不同的工具檔案,可將XML、資料庫的資料等轉換出來,並加入所需要的條件來篩選。所得出所要的簡潔資料。而不會只是將資料 Copy。
J2EE Part 18
1.Servlet
參考 Java2 第22章之Sample2 ~ Sample 8
a. Sample2.3.5.6.html 會送出 get 或 post,由 Sample2.3.5.6.java 承接。
b. 在 doGet 後面加上另一個方法 doPost,如此不論前段的 HTML怎麼寫,接可承接二種方法。
c. 注意事項:
1.目錄和超連結的路徑要修改正確。
2.修改 *.html 檔案,網頁要重新整理。
3.只要有修改 *.java 檔案,就要重新編譯一次。然後再將 Tomcat 重新啟動或 reload。
課本範例Sample2.java
import java.io.*;
import javax.servlet.*;
import javax.servlet.http.*;
public class Sample2 extends HttpServlet
{
public void doGet(HttpServletRequest request, HttpServletResponse response)
throws ServletException
{
try{
// 取得表單資料
String tmp = request.getParameter("cars");
String carname = new String(tmp.getBytes("ISO-8859-1"), "UTF-8");
// 設定內容類型
response.setContentType("text/html; charset=UTF-8");
// 輸出HTML文件
PrintWriter pw = response.getWriter();
pw.println("<html>\n" +
"<head><title>\n" + carname + "</title></head>\n" +
"<body><center>\n" +
"<h2>\n" + carname + "</h2>\n" +
"感謝您購買本公司的" + carname + "。<br/>\n" +
"</center></body>\n" +
"</html>\n");
}
catch(Exception e){
e.printStackTrace();
}
}
// 在這裡加上 doPost
public void doPost(HttpServletRequest request, HttpServletResponse response)
throws ServletException
{
this.doGet(request,response);
}
} //class
d. Sample8
這個範例是與 Sample1 相同,在加上用 web.xml & Tomcat 的帳密來做驗證機制。
web.xml
<security-constraint>
<web-resource-collection>
<web-resource-name>Sample8</web-resource-name>
<url-pattern>/Sample8</url-pattern>
</web-resource-collection>
<auth-constraint>
<role-name>admin</role-name>
<role-name>admin-gui</role-name>
</auth-constraint>
</security-constraint>
<login-config>
<auth-method>BASIC</auth-method>
</login-config>
<security-role>
<role-name>admin</role-name>
<role-name>admin-gui</role-name>
</security-role>
Tomcat 7.0/conf/tomcat-users.xml
<tomcat-users>
<user name="root" password="apple" roles="admin-gui,manager-gui,admin" />
PS:檔案修改完後需要 restart Tomcat service。
PS2:第22章 Sample4.java 程式碼有誤
原始程式碼:Sample4.java
import java.util.*;
import java.io.*;
import javax.servlet.*;
import javax.servlet.http.*;
public class Sample4 extends HttpServlet
{
public void doGet(HttpServletRequest request, HttpServletResponse response)
throws ServletException
{
try{
// 取得Session
HttpSession hs = request.getSession(true);
Integer cn = (Integer) hs.getAttribute("count");
Date dt = (Date) hs.getAttribute("date");
String str1, str2;
// 設定次數
if(cn == null){
cn = new Integer(1);
dt = new Date();
str1 = "這是您的初次造訪。";
str2 = "";
}
else{
cn = new Integer(cn.intValue() + 1);
dt = new Date(); //這裡已經更新 dt 了,所以下面 str2 會是本次的時間,因此這行要移到 str2 的下面一行。
str1 = "這是您的第" + cn + "次造訪。";
str2 = "(上次是在:" + dt + ")";
}
// 設定Session
hs.setAttribute("count", cn);
hs.setAttribute("date", dt);
// 設定內容類型
response.setContentType("text/html; charset=UTF-8");
// 輸出HTML文件
PrintWriter pw = response.getWriter();
pw.println("<html>\n" +
"<head><title>範例</title></head>\n" +
"<body><center>\n" +
"<h2>歡迎光臨</h2>" +
"<hr />\n" +
str1 + "<br/>\n" +
str2 + "<br/>\n" +
"請選擇一件商品。<br/>\n" +
"<br/>\n" +
"<a href=\"./car1.html\">汽車</a><br/>\n" +
"<a href=\"./car2.html\">卡車</a><br/>\n" +
"<a href=\"./car3.html\">戰車</a><br/>\n" +
"</center></body>\n" +
"</html>\n");
}
catch(Exception e){
e.printStackTrace();
}
}
public void doPost(HttpServletRequest request, HttpServletResponse response)
throws ServletException
{
this.doGet(request, response);
}
}
更正後的程式碼:Sample4.java
import java.util.*;
import java.io.*;
import javax.servlet.*;
import javax.servlet.http.*;
public class Sample4 extends HttpServlet
{
public void doGet(HttpServletRequest request, HttpServletResponse response)
throws ServletException
{
try{
// 取得Session
HttpSession hs = request.getSession(true);
Integer cn = (Integer) hs.getAttribute("count");
Date dt = (Date) hs.getAttribute("date");
String str1, str2;
// 設定次數
if(cn == null){
cn = new Integer(1);
dt = new Date();
str1 = "這是您的初次造訪。";
str2 = "";
}
else{
cn = new Integer(cn.intValue() + 1);
str1 = "這是您的第" + cn + "次造訪。";
str2 = "(上次是在:" + dt + ")";
dt = new Date(); //應該在這裡,上一行的時間才會是上次造訪的時間,並將這次目前的時間更新到 dt,最為下次使用。
}
// 設定Session
hs.setAttribute("count", cn);
hs.setAttribute("date", dt);
// 設定內容類型
response.setContentType("text/html; charset=UTF-8");
// 輸出HTML文件
PrintWriter pw = response.getWriter();
pw.println("<html>\n" +
"<head><title>範例</title></head>\n" +
"<body><center>\n" +
"<h2>歡迎光臨</h2>" +
"<hr />\n" +
str1 + "<br/>\n" +
str2 + "<br/>\n" +
"請選擇一件商品。<br/>\n" +
"<br/>\n" +
"<a href=\"./car1.html\">汽車</a><br/>\n" +
"<a href=\"./car2.html\">卡車</a><br/>\n" +
"<a href=\"./car3.html\">戰車</a><br/>\n" +
"</center></body>\n" +
"</html>\n");
}
catch(Exception e){
e.printStackTrace();
}
}
public void doPost(HttpServletRequest request, HttpServletResponse response)
throws ServletException
{
this.doGet(request, response);
}
}
2.jsp include 的用法
JAVA 2 / ch23\Sample4.jsp
<%@ page contentType="text/html; charset=UTF-8" %>
<%
String tmp = request.getParameter("cars");
String carname = new String(tmp.getBytes("ISO-8859-1"), "UTF-8");
%>
<html>
<head>
<title><%= carname %></title>
</head>
<body>
<center>
<h2><%= carname %></h2>
感謝您購買本公司的
<%= carname %>
。<br/><br/>
<jsp:include page="company.html" flush="true"/>
</center>
</body>
</html>
可以應用在一般公司每個網頁下方放一個公司資訊 (電話地址等等)的 frame。
一但電話住址修改,只需更改 company.html 即可,因為其他網頁都是用<jsp:includepage="company.html"> 類似超連結到該網頁。
3.JavaBeans
JavaBeans 一般作為元件(component)用,JavaBeans 漢醫般的類別差不多,但是須符合下列幾個規則:
1.實作 Serializable 介面。
2.擁有沒有參數的建構式。
3.要加上無法從類別外部直接存取欄位的修飾子。(也就是要做封裝,用 Private 參數)
4.為了設定、取得欄位的值,所以要使用特定名稱的方法 (set X X、get X X等)。
參考 Java2 第22章之Sample2 ~ Sample 8
a. Sample2.3.5.6.html 會送出 get 或 post,由 Sample2.3.5.6.java 承接。
b. 在 doGet 後面加上另一個方法 doPost,如此不論前段的 HTML怎麼寫,接可承接二種方法。
c. 注意事項:
1.目錄和超連結的路徑要修改正確。
2.修改 *.html 檔案,網頁要重新整理。
3.只要有修改 *.java 檔案,就要重新編譯一次。然後再將 Tomcat 重新啟動或 reload。
課本範例Sample2.java
import java.io.*;
import javax.servlet.*;
import javax.servlet.http.*;
public class Sample2 extends HttpServlet
{
public void doGet(HttpServletRequest request, HttpServletResponse response)
throws ServletException
{
try{
// 取得表單資料
String tmp = request.getParameter("cars");
String carname = new String(tmp.getBytes("ISO-8859-1"), "UTF-8");
// 設定內容類型
response.setContentType("text/html; charset=UTF-8");
// 輸出HTML文件
PrintWriter pw = response.getWriter();
pw.println("<html>\n" +
"<head><title>\n" + carname + "</title></head>\n" +
"<body><center>\n" +
"<h2>\n" + carname + "</h2>\n" +
"感謝您購買本公司的" + carname + "。<br/>\n" +
"</center></body>\n" +
"</html>\n");
}
catch(Exception e){
e.printStackTrace();
}
}
// 在這裡加上 doPost
public void doPost(HttpServletRequest request, HttpServletResponse response)
throws ServletException
{
this.doGet(request,response);
}
} //class
d. Sample8
這個範例是與 Sample1 相同,在加上用 web.xml & Tomcat 的帳密來做驗證機制。
web.xml
<security-constraint>
<web-resource-collection>
<web-resource-name>Sample8</web-resource-name>
<url-pattern>/Sample8</url-pattern>
</web-resource-collection>
<auth-constraint>
<role-name>admin</role-name>
<role-name>admin-gui</role-name>
</auth-constraint>
</security-constraint>
<login-config>
<auth-method>BASIC</auth-method>
</login-config>
<security-role>
<role-name>admin</role-name>
<role-name>admin-gui</role-name>
</security-role>
Tomcat 7.0/conf/tomcat-users.xml
<tomcat-users>
<user name="root" password="apple" roles="admin-gui,manager-gui,admin" />
PS:檔案修改完後需要 restart Tomcat service。
PS2:第22章 Sample4.java 程式碼有誤
原始程式碼:Sample4.java
import java.util.*;
import java.io.*;
import javax.servlet.*;
import javax.servlet.http.*;
public class Sample4 extends HttpServlet
{
public void doGet(HttpServletRequest request, HttpServletResponse response)
throws ServletException
{
try{
// 取得Session
HttpSession hs = request.getSession(true);
Integer cn = (Integer) hs.getAttribute("count");
Date dt = (Date) hs.getAttribute("date");
String str1, str2;
// 設定次數
if(cn == null){
cn = new Integer(1);
dt = new Date();
str1 = "這是您的初次造訪。";
str2 = "";
}
else{
cn = new Integer(cn.intValue() + 1);
dt = new Date(); //這裡已經更新 dt 了,所以下面 str2 會是本次的時間,因此這行要移到 str2 的下面一行。
str1 = "這是您的第" + cn + "次造訪。";
str2 = "(上次是在:" + dt + ")";
}
// 設定Session
hs.setAttribute("count", cn);
hs.setAttribute("date", dt);
// 設定內容類型
response.setContentType("text/html; charset=UTF-8");
// 輸出HTML文件
PrintWriter pw = response.getWriter();
pw.println("<html>\n" +
"<head><title>範例</title></head>\n" +
"<body><center>\n" +
"<h2>歡迎光臨</h2>" +
"<hr />\n" +
str1 + "<br/>\n" +
str2 + "<br/>\n" +
"請選擇一件商品。<br/>\n" +
"<br/>\n" +
"<a href=\"./car1.html\">汽車</a><br/>\n" +
"<a href=\"./car2.html\">卡車</a><br/>\n" +
"<a href=\"./car3.html\">戰車</a><br/>\n" +
"</center></body>\n" +
"</html>\n");
}
catch(Exception e){
e.printStackTrace();
}
}
public void doPost(HttpServletRequest request, HttpServletResponse response)
throws ServletException
{
this.doGet(request, response);
}
}
更正後的程式碼:Sample4.java
import java.util.*;
import java.io.*;
import javax.servlet.*;
import javax.servlet.http.*;
public class Sample4 extends HttpServlet
{
public void doGet(HttpServletRequest request, HttpServletResponse response)
throws ServletException
{
try{
// 取得Session
HttpSession hs = request.getSession(true);
Integer cn = (Integer) hs.getAttribute("count");
Date dt = (Date) hs.getAttribute("date");
String str1, str2;
// 設定次數
if(cn == null){
cn = new Integer(1);
dt = new Date();
str1 = "這是您的初次造訪。";
str2 = "";
}
else{
cn = new Integer(cn.intValue() + 1);
str1 = "這是您的第" + cn + "次造訪。";
str2 = "(上次是在:" + dt + ")";
dt = new Date(); //應該在這裡,上一行的時間才會是上次造訪的時間,並將這次目前的時間更新到 dt,最為下次使用。
}
// 設定Session
hs.setAttribute("count", cn);
hs.setAttribute("date", dt);
// 設定內容類型
response.setContentType("text/html; charset=UTF-8");
// 輸出HTML文件
PrintWriter pw = response.getWriter();
pw.println("<html>\n" +
"<head><title>範例</title></head>\n" +
"<body><center>\n" +
"<h2>歡迎光臨</h2>" +
"<hr />\n" +
str1 + "<br/>\n" +
str2 + "<br/>\n" +
"請選擇一件商品。<br/>\n" +
"<br/>\n" +
"<a href=\"./car1.html\">汽車</a><br/>\n" +
"<a href=\"./car2.html\">卡車</a><br/>\n" +
"<a href=\"./car3.html\">戰車</a><br/>\n" +
"</center></body>\n" +
"</html>\n");
}
catch(Exception e){
e.printStackTrace();
}
}
public void doPost(HttpServletRequest request, HttpServletResponse response)
throws ServletException
{
this.doGet(request, response);
}
}
2.jsp include 的用法
JAVA 2 / ch23\Sample4.jsp
<%@ page contentType="text/html; charset=UTF-8" %>
<%
String tmp = request.getParameter("cars");
String carname = new String(tmp.getBytes("ISO-8859-1"), "UTF-8");
%>
<html>
<head>
<title><%= carname %></title>
</head>
<body>
<center>
<h2><%= carname %></h2>
感謝您購買本公司的
<%= carname %>
。<br/><br/>
<jsp:include page="company.html" flush="true"/>
</center>
</body>
</html>
可以應用在一般公司每個網頁下方放一個公司資訊 (電話地址等等)的 frame。
一但電話住址修改,只需更改 company.html 即可,因為其他網頁都是用<jsp:includepage="company.html"> 類似超連結到該網頁。
3.JavaBeans
JavaBeans 一般作為元件(component)用,JavaBeans 漢醫般的類別差不多,但是須符合下列幾個規則:
1.實作 Serializable 介面。
2.擁有沒有參數的建構式。
3.要加上無法從類別外部直接存取欄位的修飾子。(也就是要做封裝,用 Private 參數)
4.為了設定、取得欄位的值,所以要使用特定名稱的方法 (set X X、get X X等)。
J2EE Part 17
1.複習 Try...Catch
a.語法:(參考JAVA課本 P.327)
try{ }
catch(...) { } <==可以多個catch,但子類別要在上面,父類別在下,編譯才不會錯
...
...
finally { } <==一定會被執行
老師範例程式碼一:
test.java
public class Test {
public static void main ( String[] args ){
try {
throw new Exception("丟丟銅仔!");
// System.out.println(10/0);
} catch ( ArithmeticException e ){
System.out.println("數學有問題: " +e);
} catch ( Exception e ){
System.out.println("抓到例外: " +e);
} finally {
System.out.println("finally區塊,一定會被執行!");
}
}
}
run.bat
del *.class
javac *.java
java -cp . Test
pause
老師範例程式碼二:
test.java
import java.io.*;
public class Test {
void OpenFile() throws IOException {
// void OpenFile() throws EOFException {
// throw new IOException("檔案開啟!");
throw new EOFException("檔案已經尾端");
}
public static void main(String [] args) {
Test t = new Test();
try {
t.OpenFile();
} catch (EOFException e) {
System.out.println("抓到EOFException例外: " + e);
} catch (IOException e) {
System.out.println("抓到IOException例外: " + e);
}
}
}
run.bat
del *.class
javac Test.java
java -cp Test
pause
老師範例程式碼三:
EscapedEx.java
public class EscapedEx {
// public static void main ( String[] args ){
public static void main ( String[] args ) throws InterruptedException{
System.out.print("安裝進度: ");
for( int i=0; i<=100; i+=5){
if( i < 10 ){
System.out.print( i + "%\b\b" );
} else {
System.out.print( i + "%\b\b\b" );
}
// try{
Thread.currentThread().sleep(1000);
// } catch ( Exception e ){}
} //for
} //main
} //class
run.bat
del *.class
javac EscapedEx.java
java -cp EscapedEx
pause
b.例外類別的層級關係 (父子類別)
老師範例程式碼四:
MyException.java
public class MyException extends Exception{
private int port;
public MyException ( String message, int port ){
super( message );
this.port = port;
}
public int getPort() {
return port;
}
}
test.java
public class Test {
public static void main ( String[] args ){
try {
//假設 MySQL server 發現無法連結!
throw new MyException("MySQL Server 發現無法連結: ", 3306);
} catch ( MyException e ){
System.out.println(e);
System.out.println( "port: " + e.getPort() );
}
}
}
run.bat
del *.class
javac *.java
java -cp . Test
pause
老師範例程式碼五: ( assert:斷言)
test.java
public class Test {
public static void main(String [] args) {
boolean b1 = true;
assert b1==true;
b1 = false;
try {
assert b1;
// } catch (AssertionError e) {
// } catch (Exception e) {
} catch (Error e) {
System.out.println("try catch 捉到錯誤: " + e);
}
}
}
run.bat
del *.class
javac *.java
java -ea -cp . Test
paus
老師範例程式碼六: ( assert:斷言的延伸,後面可加冒號:再帶上字串。)
test.java
public class Test {
public static void main(String [] args) {
int age =17;
assert age>=18: "我以為妳18歲了..." +age;
//可在後面加上冒號:若不符合 assert,則會秀後面的字串。
}
}
run.bat
del *.class
javac *.java
java -ea -cp . Test
pause
2.JSP 的 try...catch
請參考JSP課本的第12章 P.12-5 ~ P.12-6
程式碼:trycatch.jsp
<%@ page contentType="text/html; charset=UTF-8"
import="java.io.*"%>
<HTML>
<HEAD>
<TITLE>try-catch區塊的使用</TITLE>
</HEAD>
<BODY>
<CENTER>
<FONT SIZE = 5 COLOR = blue>try-catch區塊的使用</FONT>
</CENTER>
<HR><P></P>
<%
int a = 10, b = 0, c;
try{
c = a / b; //此敘述將產生除以零的例外
}
catch(Exception e){
out.println(e.toString());
}
finally{
out.println("<BR>這裡一定會被執行");
}
%>
</BODY>
</HTML>
3.Servlet & JSP
a.MVC
Model....View....Controller

b.Servlet:一般都作為 Model。在 server 端的模型,可重複使用。
c.JSP:一般都作為 View。顯示給 client 端看的。
d.JavaBean:一般都作為 Controller。在 server 端作控制。
4. Servlet 要設定環境變數
a. 因為Servlet 需要
import javax.servlet.*;
import javax.servlet.http.*;
,所以要再加一個環境變數在 CLASSPATH 裡面。

5. Java2 Servlet
請參考 Java2 P.496 ~
a. 修改 web.xml 檔案中的 <servelt-mapping> 中 url 的路徑,如下圖。

b. 修改 Sample1.java ~ Sample8.java 的超連結路徑,如下圖。

a.語法:(參考JAVA課本 P.327)
try{ }
catch(...) { } <==可以多個catch,但子類別要在上面,父類別在下,編譯才不會錯
...
...
finally { } <==一定會被執行
老師範例程式碼一:
test.java
public class Test {
public static void main ( String[] args ){
try {
throw new Exception("丟丟銅仔!");
// System.out.println(10/0);
} catch ( ArithmeticException e ){
System.out.println("數學有問題: " +e);
} catch ( Exception e ){
System.out.println("抓到例外: " +e);
} finally {
System.out.println("finally區塊,一定會被執行!");
}
}
}
run.bat
del *.class
javac *.java
java -cp . Test
pause
老師範例程式碼二:
test.java
import java.io.*;
public class Test {
void OpenFile() throws IOException {
// void OpenFile() throws EOFException {
// throw new IOException("檔案開啟!");
throw new EOFException("檔案已經尾端");
}
public static void main(String [] args) {
Test t = new Test();
try {
t.OpenFile();
} catch (EOFException e) {
System.out.println("抓到EOFException例外: " + e);
} catch (IOException e) {
System.out.println("抓到IOException例外: " + e);
}
}
}
run.bat
del *.class
javac Test.java
java -cp Test
pause
老師範例程式碼三:
EscapedEx.java
public class EscapedEx {
// public static void main ( String[] args ){
public static void main ( String[] args ) throws InterruptedException{
System.out.print("安裝進度: ");
for( int i=0; i<=100; i+=5){
if( i < 10 ){
System.out.print( i + "%\b\b" );
} else {
System.out.print( i + "%\b\b\b" );
}
// try{
Thread.currentThread().sleep(1000);
// } catch ( Exception e ){}
} //for
} //main
} //class
run.bat
del *.class
javac EscapedEx.java
java -cp EscapedEx
pause
b.例外類別的層級關係 (父子類別)
老師範例程式碼四:
MyException.java
public class MyException extends Exception{
private int port;
public MyException ( String message, int port ){
super( message );
this.port = port;
}
public int getPort() {
return port;
}
}
test.java
public class Test {
public static void main ( String[] args ){
try {
//假設 MySQL server 發現無法連結!
throw new MyException("MySQL Server 發現無法連結: ", 3306);
} catch ( MyException e ){
System.out.println(e);
System.out.println( "port: " + e.getPort() );
}
}
}
run.bat
del *.class
javac *.java
java -cp . Test
pause
老師範例程式碼五: ( assert:斷言)
test.java
public class Test {
public static void main(String [] args) {
boolean b1 = true;
assert b1==true;
b1 = false;
try {
assert b1;
// } catch (AssertionError e) {
// } catch (Exception e) {
} catch (Error e) {
System.out.println("try catch 捉到錯誤: " + e);
}
}
}
run.bat
del *.class
javac *.java
java -ea -cp . Test
paus
老師範例程式碼六: ( assert:斷言的延伸,後面可加冒號:再帶上字串。)
test.java
public class Test {
public static void main(String [] args) {
int age =17;
assert age>=18: "我以為妳18歲了..." +age;
//可在後面加上冒號:若不符合 assert,則會秀後面的字串。
}
}
run.bat
del *.class
javac *.java
java -ea -cp . Test
pause
2.JSP 的 try...catch
請參考JSP課本的第12章 P.12-5 ~ P.12-6
程式碼:trycatch.jsp
<%@ page contentType="text/html; charset=UTF-8"
import="java.io.*"%>
<HTML>
<HEAD>
<TITLE>try-catch區塊的使用</TITLE>
</HEAD>
<BODY>
<CENTER>
<FONT SIZE = 5 COLOR = blue>try-catch區塊的使用</FONT>
</CENTER>
<HR><P></P>
<%
int a = 10, b = 0, c;
try{
c = a / b; //此敘述將產生除以零的例外
}
catch(Exception e){
out.println(e.toString());
}
finally{
out.println("<BR>這裡一定會被執行");
}
%>
</BODY>
</HTML>
3.Servlet & JSP
a.MVC
Model....View....Controller

b.Servlet:一般都作為 Model。在 server 端的模型,可重複使用。
c.JSP:一般都作為 View。顯示給 client 端看的。
d.JavaBean:一般都作為 Controller。在 server 端作控制。
4. Servlet 要設定環境變數
a. 因為Servlet 需要
import javax.servlet.*;
import javax.servlet.http.*;
,所以要再加一個環境變數在 CLASSPATH 裡面。

5. Java2 Servlet
請參考 Java2 P.496 ~
a. 修改 web.xml 檔案中的 <servelt-mapping> 中 url 的路徑,如下圖。

b. 修改 Sample1.java ~ Sample8.java 的超連結路徑,如下圖。

J2EE Part 16
1.下載檔案
SimpleServer.java (01_download_file)
import java.net.*;
import java.io.*;
public class SimpleServer {
public static void main ( String args [ ] ){
ServerSocket s = null;
try {
s = new ServerSocket ( 5433 );
} catch ( IOException e ){
e.printStackTrace();
}
while ( true ){
try{
Socket s1 = s.accept();
OutputStream s1out = s1.getOutputStream();
// BufferedWriter bw = new BufferedWriter( new OutputStreamWriter(s1out) );
// bw.write( "Hello Net World! I am the teacher winjow!\n" );
FileInputStream fis = new FileInputStream("libertytimes.htm");
int data =0;
while ( (data =fis.read()) != -1 ){
s1out.write(data);
}
// bw.close();
s1.close();
fis.close();
} catch ( IOException e ){
e.printStackTrace();
}
} // while
} // main
} // class
SimpleClient.java
import java.net.*;
import java.io.*;
public class SimpleClient{
public static void main( String[] args ){
try{
Socket s1 = new Socket("192.168.2.168", 5433);
InputStream is = s1.getInputStream();
// InputStreamReader isr = new InputStreamReader( is );
// BufferedReader br = new BufferedReader( isr );
// System.out.println( br.readLine() );
FileOutputStream fos = new FileOutputStream("test2.htm");
int data =0;
while ( (data = is.read()) !=-1 ){
fos.write(data);
}
// br.close();
fos.close();
s1.close();
} catch ( ConnectException connExc ){
System.err.println( "Could not connect." );
} catch ( IOException e ){
System.out.println(e);
}
} //main()
} //class
2.Try...Catch
範例一 (02_try_catch_ex):
test.java
public class Test {
public static void main ( String[] args ){
Human h01 = new Human();
try {
h01.setLegs(-1);
} catch (IllegalArgumentException e){
System.out.print(e);
} catch (Exception e ){
System.out.print(e);
}
System.out.println( ", " +h01.getLegs() );
}
}
human.java
public class Human {
String name;
private byte legs=2;
public void setLegs(int legs){
if ( legs >=0 ){
this.legs = (byte)legs;
} else {
throw new IllegalArgumentException("腿數: " +legs);
}
}
public byte getLegs(){
return legs;
}
}
run.bat
del *.class
javac *.java
java -cp . Test
pause
結果:

範例二 (03_try_catch_ex2:
test.java
public class Test {
public static void main ( String[] args ){
int a=10, b=0, c=0;
try {
c = a/b;
System.out.println( c );
} catch (Exception e ){
System.out.println("別鬧了! 分母怎會是: " +b);
}
System.out.println();
System.out.println("程式結束!");
}
}
run.bat
del *.class
javac *.java
java -cp . Test
pause
結果:

SimpleServer.java (01_download_file)
import java.net.*;
import java.io.*;
public class SimpleServer {
public static void main ( String args [ ] ){
ServerSocket s = null;
try {
s = new ServerSocket ( 5433 );
} catch ( IOException e ){
e.printStackTrace();
}
while ( true ){
try{
Socket s1 = s.accept();
OutputStream s1out = s1.getOutputStream();
// BufferedWriter bw = new BufferedWriter( new OutputStreamWriter(s1out) );
// bw.write( "Hello Net World! I am the teacher winjow!\n" );
FileInputStream fis = new FileInputStream("libertytimes.htm");
int data =0;
while ( (data =fis.read()) != -1 ){
s1out.write(data);
}
// bw.close();
s1.close();
fis.close();
} catch ( IOException e ){
e.printStackTrace();
}
} // while
} // main
} // class
SimpleClient.java
import java.net.*;
import java.io.*;
public class SimpleClient{
public static void main( String[] args ){
try{
Socket s1 = new Socket("192.168.2.168", 5433);
InputStream is = s1.getInputStream();
// InputStreamReader isr = new InputStreamReader( is );
// BufferedReader br = new BufferedReader( isr );
// System.out.println( br.readLine() );
FileOutputStream fos = new FileOutputStream("test2.htm");
int data =0;
while ( (data = is.read()) !=-1 ){
fos.write(data);
}
// br.close();
fos.close();
s1.close();
} catch ( ConnectException connExc ){
System.err.println( "Could not connect." );
} catch ( IOException e ){
System.out.println(e);
}
} //main()
} //class
2.Try...Catch
範例一 (02_try_catch_ex):
test.java
public class Test {
public static void main ( String[] args ){
Human h01 = new Human();
try {
h01.setLegs(-1);
} catch (IllegalArgumentException e){
System.out.print(e);
} catch (Exception e ){
System.out.print(e);
}
System.out.println( ", " +h01.getLegs() );
}
}
human.java
public class Human {
String name;
private byte legs=2;
public void setLegs(int legs){
if ( legs >=0 ){
this.legs = (byte)legs;
} else {
throw new IllegalArgumentException("腿數: " +legs);
}
}
public byte getLegs(){
return legs;
}
}
run.bat
del *.class
javac *.java
java -cp . Test
pause
結果:

範例二 (03_try_catch_ex2:
test.java
public class Test {
public static void main ( String[] args ){
int a=10, b=0, c=0;
try {
c = a/b;
System.out.println( c );
} catch (Exception e ){
System.out.println("別鬧了! 分母怎會是: " +b);
}
System.out.println();
System.out.println("程式結束!");
}
}
run.bat
del *.class
javac *.java
java -cp . Test
pause
結果:

J2EE Part 15
1.下載字串
a. 先建立一個 server,開放 port 5432 (SimpleServer.java)。
程式碼:
SimpleServer.java
import java.net.*;
import java.io.*;
public class SimpleServer {
public static void main ( String args [ ] ){
ServerSocket s = null;
try {
s = new ServerSocket ( 5432 );
} catch ( IOException e ){
e.printStackTrace();
}
while ( true ){
try{
Socket s1 = s.accept();
OutputStream s1out = s1.getOutputStream();
BufferedWriter bw = new BufferedWriter( new OutputStreamWriter(s1out) );
bw.write( "Hello Net World! I am the teacher winjow!\n" );
bw.close();
s1.close();
} catch ( IOException e ){
e.printStackTrace();
}
} // while
} // main
} // class
run_server.bat
javac SimpleServer.java
java -cp . SimpleServer
pause
b. 執行 client 下載程式 (SimpleClient.java)。
程式碼:
SimpleClient.java
import java.net.*;
import java.io.*;
public class SimpleClient{
public static void main( String[] args ){
try{
Socket s1 = new Socket("192.168.2.168", 5432);
InputStream is = s1.getInputStream();
InputStreamReader isr = new InputStreamReader( is );
BufferedReader br = new BufferedReader( isr );
System.out.println( br.readLine() );
br.close();
s1.close();
} catch ( ConnectException connExc ){
System.err.println( "Could not connect." );
} catch ( IOException e ){
System.out.println(e);
}
} //main()
} //class
run_client.bat
javac SimpleClient.java
java -cp . SimpleClient
pause
2.下載檔案,利用二位元(byte)傳輸
a.利用二位元傳輸的好處是,不管原始檔案是何種類型(文字、聲音、影像、圖片等等),都可以做。
b.程式邏輯及用字:有"Stream"就是二位元;有"File"就是檔案。
Server 端:
讀取檔案用:FileInputStream
輸出二位元到網路用:OutputStream
Client 端:
從網路讀取二位元用:InputStream
輸出並儲存到檔案用:FileOutputStream

程式碼:
PS 課外:如何在網頁的圖片上顯示文字及時間
感謝黛安娜同學辛苦的爬文、測試!
利用 table 包 table 的概念:
1.在一個 <table> 裡只放一個 <td>,利用在 <td> 裡面使用控制大小的參數,來控制 table 的大小。
2.然後在這 <td> 裡面放一張圖片,用上面控制大小的方法,來符合該圖片的大小(像素)。
3.在第一個 <td> 裡,再建一個 table,這個 table 裡再建立一個 <td>。
4.在第二個 <td> 裡,就可以上下置中(valign='middle')、左右置中(align='center')。然後將文字及時間放入。
程式碼:
<%@ page contentType="text/html;charset=UTF-8"
import="java.util.*"%>
<html>
<head><title>Hello World!</title></head>
<body background='../images/99.jpg' ><br><br><br>
<CENTER>
<TABLE background='../images/011.gif' border=0 cellPadding=3 cellSpacing=1>
<TD vAlign=center align=center width="560" height=420>
<TABLE border=0 >
<TD align=center vAlign=center width="400" height=300 >
<%
out.println("<img src='../images/welcome06_07.gif'><br>");
out.println("<center><H1>現在時間</H1></center>");
out.println("<H3><B>"+new Date()+"</B></H3>");
%>
</TD>
</TABLE>
</TD>
</TABLE><br><br>
<a href='../index.jsp'><center> <img src='../images/home_465.gif' ></center> </a><br>
</body>
</html>
結果:


a. 先建立一個 server,開放 port 5432 (SimpleServer.java)。
程式碼:
SimpleServer.java
import java.net.*;
import java.io.*;
public class SimpleServer {
public static void main ( String args [ ] ){
ServerSocket s = null;
try {
s = new ServerSocket ( 5432 );
} catch ( IOException e ){
e.printStackTrace();
}
while ( true ){
try{
Socket s1 = s.accept();
OutputStream s1out = s1.getOutputStream();
BufferedWriter bw = new BufferedWriter( new OutputStreamWriter(s1out) );
bw.write( "Hello Net World! I am the teacher winjow!\n" );
bw.close();
s1.close();
} catch ( IOException e ){
e.printStackTrace();
}
} // while
} // main
} // class
run_server.bat
javac SimpleServer.java
java -cp . SimpleServer
pause
b. 執行 client 下載程式 (SimpleClient.java)。
程式碼:
SimpleClient.java
import java.net.*;
import java.io.*;
public class SimpleClient{
public static void main( String[] args ){
try{
Socket s1 = new Socket("192.168.2.168", 5432);
InputStream is = s1.getInputStream();
InputStreamReader isr = new InputStreamReader( is );
BufferedReader br = new BufferedReader( isr );
System.out.println( br.readLine() );
br.close();
s1.close();
} catch ( ConnectException connExc ){
System.err.println( "Could not connect." );
} catch ( IOException e ){
System.out.println(e);
}
} //main()
} //class
run_client.bat
javac SimpleClient.java
java -cp . SimpleClient
pause
2.下載檔案,利用二位元(byte)傳輸
a.利用二位元傳輸的好處是,不管原始檔案是何種類型(文字、聲音、影像、圖片等等),都可以做。
b.程式邏輯及用字:有"Stream"就是二位元;有"File"就是檔案。
Server 端:
讀取檔案用:FileInputStream
輸出二位元到網路用:OutputStream
Client 端:
從網路讀取二位元用:InputStream
輸出並儲存到檔案用:FileOutputStream

程式碼:
PS 課外:如何在網頁的圖片上顯示文字及時間
感謝黛安娜同學辛苦的爬文、測試!
利用 table 包 table 的概念:
1.在一個 <table> 裡只放一個 <td>,利用在 <td> 裡面使用控制大小的參數,來控制 table 的大小。
2.然後在這 <td> 裡面放一張圖片,用上面控制大小的方法,來符合該圖片的大小(像素)。
3.在第一個 <td> 裡,再建一個 table,這個 table 裡再建立一個 <td>。
4.在第二個 <td> 裡,就可以上下置中(valign='middle')、左右置中(align='center')。然後將文字及時間放入。
程式碼:
<%@ page contentType="text/html;charset=UTF-8"
import="java.util.*"%>
<html>
<head><title>Hello World!</title></head>
<body background='../images/99.jpg' ><br><br><br>
<CENTER>
<TABLE background='../images/011.gif' border=0 cellPadding=3 cellSpacing=1>
<TD vAlign=center align=center width="560" height=420>
<TABLE border=0 >
<TD align=center vAlign=center width="400" height=300 >
<%
out.println("<img src='../images/welcome06_07.gif'><br>");
out.println("<center><H1>現在時間</H1></center>");
out.println("<H3><B>"+new Date()+"</B></H3>");
%>
</TD>
</TABLE>
</TD>
</TABLE><br><br>
<a href='../index.jsp'><center> <img src='../images/home_465.gif' ></center> </a><br>
</body>
</html>
結果:


J2EE Part 14
1.SQL update Syntax practice
To complete this function by using 3 .jsp files
Index.jsp: Show employee information, each word with a "modified" word, as a hyperlink to "edit.jsp".
Edit.jsp: The place to modify the data, there are two buttons "Update" and "Cancel".
Update_db.jsp: There is no screen, only the update action, after returning to "index.jsp".
共有三個檔案來完成此功能
index.jsp:秀出員工資料,每一筆資料後面帶一個"修改"字樣,做為超連結到"edit.jsp"。
edit.jsp:修改資料的地方,有"更新"以及"取消"二個按鈕。
update_db.jsp:沒有畫面,只做更新的動作,做完後回到 "index.jsp"。
Code:
index.jsp
<%@ page import="java.sql.*" contentType="text/html;charset=UTF-8" %>
<html>
<head>
<title>UPDATE Syntax Practice</title>
</head>
<body bgcolor="skyblue">
SQL UPDATE Syntax Practice
<a href='../'>BACK</a>
<hr>
<%
Class.forName("com.mysql.jdbc.Driver");
String url = "jdbc:mysql://localhost:3306/company?user=root&password=apple&charset=utf8";
Connection con = DriverManager.getConnection(url);
Statement stmt = con.createStatement();
//下SQL語法,將所有員工資料取出並依照 ID 由小到大排序
String strSQL = "SELECT * FROM employee order by 'ID'";
//將上述準備好的員工資料,放到 ResultSet 中(就是放到記憶體)。
ResultSet rs = stmt.executeQuery(strSQL);
String ID=null;
String c_name=null;
String e_name=null;
String d_name=null;
String position=null;
String pwd=null;
//開始畫表格
out.print("<table border='1'>");
//表格第一列的欄位名稱為資料的屬性
out.print("<tr align='center'><td><b>ID</b></td><td><b>中文名</b></td><td><b>英文名</b></td><td><b>部門別</b></td><td><b>職務</b></td><td><b>密碼</b></td><td></td></tr>");
while ( rs.next() ){
//從 ResultSet 中取出員工資料
ID = rs.getString("ID");
c_name = rs.getString("c_name");
e_name = rs.getString("e_name");
d_name = rs.getString("d_name");
position = rs.getString("position");
pwd = rs.getString("pwd");
//印出表格,內含員工資訊
out.print("<tr><td>" +ID + "</td><td>");
out.print(c_name + "</td><td>");
out.print(e_name + "</td><td>");
out.print(d_name + "</td><td>");
out.print(position + "</td><td>");
out.print(pwd + "</td><td>");
//將 ID 作為參數,嵌入到每一列最右方的超連結中。
out.print( "<a href='./edit.jsp?ID=" +ID +"'>修改</a></td></tr>");
}
out.println("</table>");
stmt.close();
con.close();
%>
</body>
</html>
Result:
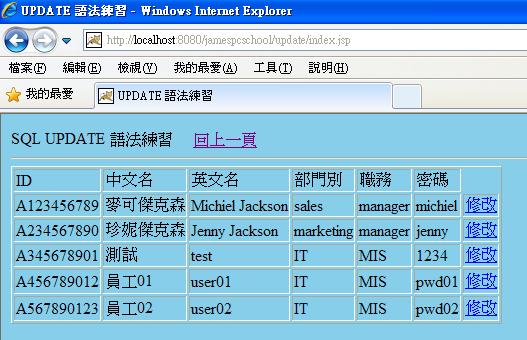
edit.jsp
<%@ page import="java.sql.*" contentType="text/html;charset=UTF-8" %>
<html>
<head>
<title>修改</title>
</head>
<body bgcolor='skyblue'>
<!-- 用 form 來做一個 "更新" 的按鈕,導到 update_db.jsp。 -->
<form name='f1' method='post' action='update_db.jsp'>
<%
//銜接由 index.jsp 最後面傳出的參數 ID,放到字串 ID 裡
String ID = request.getParameter("ID");
//判斷 ID不可為null,且長度大於零。(老師的範例是用 e_name 當參數,所以要判斷)
// 我是用 ID 當參數,一定符合上述條件,所以可以不必判斷。
if (ID != null && ID.length() > 0) {
Class.forName("com.mysql.jdbc.Driver");
String url = "jdbc:mysql://localhost:3306/company?user=root&password=apple&charset=utf8";
Connection con = DriverManager.getConnection(url);
Statement stmt = con.createStatement();
//這裡只取出符合 ID 的員工資訊,也就是在 index.jsp 中,所選取的該列的 ID
String strSQL = "SELECT * FROM employee where ID = '" + ID +"'";
ResultSet rs = stmt.executeQuery(strSQL);
if (rs.next()){
//這裡先顯示 ID (不是在 textbox 裡面,所以不可變更)。
//再用隱藏 (type='hidden')的 <input> 帶出參數 ID 給 update_db.jsp 使用
out.print("帳號:" + ID + "<input type='hidden' name='ID' value='" +rs.getString("ID") +"'></br>");
out.print("中文名:<input type='text' name='c_name' value='" + rs.getString("c_name") + "'></br>");
out.print("英文名:<input type='text' name='e_name' value='" + rs.getString("e_name") + "'></br>");
out.print("部門別:<input type='text' name='d_name' value='" + rs.getString("d_name") + "'></br>");
//為了對齊 textbox,所以用一些空格
out.print("職務: <input type='text' name='position' value='" + rs.getString("position") + "'></br>");
out.print("密碼: <input type='text' name='pwd' value='" + rs.getString("pwd") + "'></br>");
//第一個 form 的按鈕,送出更新的訊息到 update_db.jsp。
out.print("<input type='submit' value='更新'>");
}
stmt.close();
con.close();
}
%>
</form>
//第二個 form 開始,只做取消用,導回 index.jsp。
<form name='f2' method='post' action='index.jsp'>
<input type='submit' value='取消'>
</form>
</body>
</html>
Result:

update_db.jsp
<%@ page import="java.sql.*" contentType="text/html;charset=UTF-8" %>
<%
String ID = request.getParameter("ID");
String c_name = request.getParameter("c_name");
String e_name = request.getParameter("e_name");
String d_name = request.getParameter("d_name");
String position = request.getParameter("position");
String pwd = request.getParameter("pwd");
if ( c_name !=null && c_name.length() >0 ){
c_name = new String( c_name.getBytes("ISO-8859-1"), "UTF-8");
}
//判斷所有可輸入的欄位不可為 null,且長度大於零。
if (
e_name != null && e_name.length() >0
&& d_name != null && d_name.length() >0
&& position != null && position.length() >0
&& pwd != null && pwd.length() >0
){
Class.forName("com.mysql.jdbc.Driver");
String url = "jdbc:mysql://localhost:3306/company?user=root&password=apple&charset=utf8";
Connection con = DriverManager.getConnection(url);
Statement stmt = con.createStatement();
String strSQL = "UPDATE employee "
+"SET c_name = '" + c_name + "'"
+", e_name = '" + e_name + "'"
+", d_name = '" + d_name + "'"
+", position = '" + position + "'"
+", pwd = '" + pwd + "'"
+" WHERE ID = '" + ID +"'";
// out.print( strSQL ); 在程式為寫完前,先顯示出SQL語法是否正確。
stmt.execute(strSQL);
stmt.close();
con.close();
} //if
response.sendRedirect("index.jsp");
%>
Result:

2. message board 留言板 -- SQL
共有六個檔案來完成功能,存在 "jamespcschool / message_sql "資料夾內
index.jsp:輸入帳號密碼來登入,"確認"連結到"check.jsp"做檢查。
check.jsp(沒有畫面):檢查錯誤導到"error.html",檢查正確導到"guest_book.jsp"。
error.html:顯示錯誤訊息,並按一超連結回登入畫面"index.jsp"。
guest_book.jsp:先從資料庫撈出既有的留言,顯示在畫面上,依時間順序,愈新的留言愈上面。並帶上留言板以及按鈕(可將資料導到 "input.jsp")。
logout.jsp(沒有畫面):將session 釋放,回到登入畫面。
input.jsp(沒有畫面):將最新的留言存到資料庫,然後導回 "guest_book.jsp",就會顯示出最新的留言。

Code:
index.jsp
<html>
<head>
<meta http-equiv="Content-Type" content="text/html; charset=UTF-8">
</head>
<body bgcolor='skyblue'>
<a href='../index.jsp'> 回上一頁 </a><hr>
<font color='red'><b>SQL 留言板</b></font> 請登入
<form name='f1' method='post' action='check.jsp'>
帳號: <input type='text' name='act'></br>
密碼: <input type='password' name='pwd'> </br></br>
<input type='reset' value='全部清空'>
<input type='submit' value='確認送出'> <br>
</form>
</body>
</html>
Result:

check.jsp (無畫面)
<%@ page contentType="text/html; charset=UTF-8" import="java.sql.*" %>
<%
String act = request.getParameter("act");
String pwd = request.getParameter("pwd");
Class.forName("com.mysql.jdbc.Driver");
String url = "jdbc:mysql://localhost:3306/company?user=root&password=apple&charset=utf8";
Connection con = DriverManager.getConnection(url);
Statement stmt = con.createStatement();
String strSQL = "SELECT * FROM employee where e_name = '" + act + "'";
ResultSet rs = stmt.executeQuery(strSQL);
if (
pwd != null
&& rs.next()
&& rs.getString("pwd") != null
&& pwd.equals(rs.getString("pwd"))
){
session.setAttribute("uid",act);
session.setAttribute("c_name",rs.getString("c_name"));
response.sendRedirect("guest_book.jsp");
} else {
response.sendRedirect("error.html");
} //if
stmt.close();
con.close();
%>
error.html
帳號或密碼錯誤
<a href='index.jsp'>重新輸入</a>
Result:

guest_book.jsp
<%@ page contentType="text/html; charset=UTF-8" import="java.sql.*" %>
<html>
<head>
<title>留言板</title>
</head>
<%
if (session.getAttribute("uid") == null){
response.sendRedirect("error.html");
} //if
%>
<body bgcolor='skyblue'>
<font color='blue'><b><%= session.getAttribute("c_name")%></b></font> 你好! 歡迎蒞臨 SQL 留言板</br></br>
<form name='logout' method='post' action='logout.jsp'>
<input type='submit' value='登出'>
<a href='./logout.jsp'>登出</a>
</form>
<hr>
<form name='f1' method='post' action='input.jsp'>
<textarea name='content'>請留言</textarea>
<input type='submit' value='提交'>
</form>
// 畫表格
<table border='1' width='80%'>
<%
Class.forName("com.mysql.jdbc.Driver");
String url = "jdbc:mysql://localhost:3306/company?user=root&password=apple&charset=utf8";
Connection con = DriverManager.getConnection(url);
Statement stmt = con.createStatement();
// select 資料後,依照時間反向排列,再放入 ResultSet。
String strSQL = "SELECT * FROM guest_book ORDER BY w_time DESC";
ResultSet rs = stmt.executeQuery(strSQL);
while ( rs.next() ){
out.print( "<tr><td><font color='blue'>" +rs.getString("g_name") +"</font></td>");
out.print( "<td>" +rs.getString("w_time") +"</td></tr>");
out.print( "<tr><td colspan='2'>" +rs.getString("w_content") +"</td></tr>");
}
stmt.close();
con.close();
%>
</table>
</body>
</html>
Result:

馬上留言之後,最新的留言在最上面

logout.jsp (無畫面)
<%
session.setAttribute("uid",null);
response.sendRedirect("index.jsp");
%>
input.jsp (無畫面)
<%@ page contentType="text/html; charset=UTF-8" import="java.sql.*" %>
<%
if (session.getAttribute("uid") ==null){
response.sendRedirect("error.html");
} //if
String content = request.getParameter("content");
//先將留言板內的字型轉為 UTF-8,以免產生亂碼 。
if ( content != null && content.length() >0 ){
content = new String (content.getBytes("ISO-8859-1"), "UTF-8");
//將特殊符號改成全形,也面被有心人士破壞。
content = content.replace('<','<');
content = content.replace('>','>');
content = content.replace('\'','’');
content = content.replace('\"','”');
Class.forName("com.mysql.jdbc.Driver");
String url = "jdbc:mysql://localhost:3306/company?user=root&password=apple&charset=utf8";
Connection con = DriverManager.getConnection(url);
Statement stmt = con.createStatement();
//將留言板的資料寫入資料庫
String strSQL = "INSERT INTO guest_book (g_name, w_content) VALUES ('"
+ session.getAttribute("c_name") +"','" +content +"')";
// out.print(strSQL); 先利用這一行來檢查 SQL 語法是否正確。
stmt.execute(strSQL);
stmt.close();
con.close();
} //if
//寫完資料後,導回"guest_book.jsp"就可顯示出所有資料。
response.sendRedirect("guest_book.jsp");
%>
To complete this function by using 3 .jsp files
Index.jsp: Show employee information, each word with a "modified" word, as a hyperlink to "edit.jsp".
Edit.jsp: The place to modify the data, there are two buttons "Update" and "Cancel".
Update_db.jsp: There is no screen, only the update action, after returning to "index.jsp".
共有三個檔案來完成此功能
index.jsp:秀出員工資料,每一筆資料後面帶一個"修改"字樣,做為超連結到"edit.jsp"。
edit.jsp:修改資料的地方,有"更新"以及"取消"二個按鈕。
update_db.jsp:沒有畫面,只做更新的動作,做完後回到 "index.jsp"。
Code:
index.jsp
<%@ page import="java.sql.*" contentType="text/html;charset=UTF-8" %>
<html>
<head>
<title>UPDATE Syntax Practice</title>
</head>
<body bgcolor="skyblue">
SQL UPDATE Syntax Practice
<a href='../'>BACK</a>
<hr>
<%
Class.forName("com.mysql.jdbc.Driver");
String url = "jdbc:mysql://localhost:3306/company?user=root&password=apple&charset=utf8";
Connection con = DriverManager.getConnection(url);
Statement stmt = con.createStatement();
//下SQL語法,將所有員工資料取出並依照 ID 由小到大排序
String strSQL = "SELECT * FROM employee order by 'ID'";
//將上述準備好的員工資料,放到 ResultSet 中(就是放到記憶體)。
ResultSet rs = stmt.executeQuery(strSQL);
String ID=null;
String c_name=null;
String e_name=null;
String d_name=null;
String position=null;
String pwd=null;
//開始畫表格
out.print("<table border='1'>");
//表格第一列的欄位名稱為資料的屬性
out.print("<tr align='center'><td><b>ID</b></td><td><b>中文名</b></td><td><b>英文名</b></td><td><b>部門別</b></td><td><b>職務</b></td><td><b>密碼</b></td><td></td></tr>");
while ( rs.next() ){
//從 ResultSet 中取出員工資料
ID = rs.getString("ID");
c_name = rs.getString("c_name");
e_name = rs.getString("e_name");
d_name = rs.getString("d_name");
position = rs.getString("position");
pwd = rs.getString("pwd");
//印出表格,內含員工資訊
out.print("<tr><td>" +ID + "</td><td>");
out.print(c_name + "</td><td>");
out.print(e_name + "</td><td>");
out.print(d_name + "</td><td>");
out.print(position + "</td><td>");
out.print(pwd + "</td><td>");
//將 ID 作為參數,嵌入到每一列最右方的超連結中。
out.print( "<a href='./edit.jsp?ID=" +ID +"'>修改</a></td></tr>");
}
out.println("</table>");
stmt.close();
con.close();
%>
</body>
</html>
Result:

edit.jsp
<%@ page import="java.sql.*" contentType="text/html;charset=UTF-8" %>
<html>
<head>
<title>修改</title>
</head>
<body bgcolor='skyblue'>
<!-- 用 form 來做一個 "更新" 的按鈕,導到 update_db.jsp。 -->
<form name='f1' method='post' action='update_db.jsp'>
<%
//銜接由 index.jsp 最後面傳出的參數 ID,放到字串 ID 裡
String ID = request.getParameter("ID");
//判斷 ID不可為null,且長度大於零。(老師的範例是用 e_name 當參數,所以要判斷)
// 我是用 ID 當參數,一定符合上述條件,所以可以不必判斷。
if (ID != null && ID.length() > 0) {
Class.forName("com.mysql.jdbc.Driver");
String url = "jdbc:mysql://localhost:3306/company?user=root&password=apple&charset=utf8";
Connection con = DriverManager.getConnection(url);
Statement stmt = con.createStatement();
//這裡只取出符合 ID 的員工資訊,也就是在 index.jsp 中,所選取的該列的 ID
String strSQL = "SELECT * FROM employee where ID = '" + ID +"'";
ResultSet rs = stmt.executeQuery(strSQL);
if (rs.next()){
//這裡先顯示 ID (不是在 textbox 裡面,所以不可變更)。
//再用隱藏 (type='hidden')的 <input> 帶出參數 ID 給 update_db.jsp 使用
out.print("帳號:" + ID + "<input type='hidden' name='ID' value='" +rs.getString("ID") +"'></br>");
out.print("中文名:<input type='text' name='c_name' value='" + rs.getString("c_name") + "'></br>");
out.print("英文名:<input type='text' name='e_name' value='" + rs.getString("e_name") + "'></br>");
out.print("部門別:<input type='text' name='d_name' value='" + rs.getString("d_name") + "'></br>");
//為了對齊 textbox,所以用一些空格
out.print("職務: <input type='text' name='position' value='" + rs.getString("position") + "'></br>");
out.print("密碼: <input type='text' name='pwd' value='" + rs.getString("pwd") + "'></br>");
//第一個 form 的按鈕,送出更新的訊息到 update_db.jsp。
out.print("<input type='submit' value='更新'>");
}
stmt.close();
con.close();
}
%>
</form>
//第二個 form 開始,只做取消用,導回 index.jsp。
<form name='f2' method='post' action='index.jsp'>
<input type='submit' value='取消'>
</form>
</body>
</html>
Result:

update_db.jsp
<%@ page import="java.sql.*" contentType="text/html;charset=UTF-8" %>
<%
String ID = request.getParameter("ID");
String c_name = request.getParameter("c_name");
String e_name = request.getParameter("e_name");
String d_name = request.getParameter("d_name");
String position = request.getParameter("position");
String pwd = request.getParameter("pwd");
if ( c_name !=null && c_name.length() >0 ){
c_name = new String( c_name.getBytes("ISO-8859-1"), "UTF-8");
}
//判斷所有可輸入的欄位不可為 null,且長度大於零。
if (
e_name != null && e_name.length() >0
&& d_name != null && d_name.length() >0
&& position != null && position.length() >0
&& pwd != null && pwd.length() >0
){
Class.forName("com.mysql.jdbc.Driver");
String url = "jdbc:mysql://localhost:3306/company?user=root&password=apple&charset=utf8";
Connection con = DriverManager.getConnection(url);
Statement stmt = con.createStatement();
String strSQL = "UPDATE employee "
+"SET c_name = '" + c_name + "'"
+", e_name = '" + e_name + "'"
+", d_name = '" + d_name + "'"
+", position = '" + position + "'"
+", pwd = '" + pwd + "'"
+" WHERE ID = '" + ID +"'";
// out.print( strSQL ); 在程式為寫完前,先顯示出SQL語法是否正確。
stmt.execute(strSQL);
stmt.close();
con.close();
} //if
response.sendRedirect("index.jsp");
%>
Result:

2. message board 留言板 -- SQL
共有六個檔案來完成功能,存在 "jamespcschool / message_sql "資料夾內
index.jsp:輸入帳號密碼來登入,"確認"連結到"check.jsp"做檢查。
check.jsp(沒有畫面):檢查錯誤導到"error.html",檢查正確導到"guest_book.jsp"。
error.html:顯示錯誤訊息,並按一超連結回登入畫面"index.jsp"。
guest_book.jsp:先從資料庫撈出既有的留言,顯示在畫面上,依時間順序,愈新的留言愈上面。並帶上留言板以及按鈕(可將資料導到 "input.jsp")。
logout.jsp(沒有畫面):將session 釋放,回到登入畫面。
input.jsp(沒有畫面):將最新的留言存到資料庫,然後導回 "guest_book.jsp",就會顯示出最新的留言。
Code:
index.jsp
<html>
<head>
<meta http-equiv="Content-Type" content="text/html; charset=UTF-8">
</head>
<body bgcolor='skyblue'>
<a href='../index.jsp'> 回上一頁 </a><hr>
<font color='red'><b>SQL 留言板</b></font> 請登入
<form name='f1' method='post' action='check.jsp'>
帳號: <input type='text' name='act'></br>
密碼: <input type='password' name='pwd'> </br></br>
<input type='reset' value='全部清空'>
<input type='submit' value='確認送出'> <br>
</form>
</body>
</html>
Result:

check.jsp (無畫面)
<%@ page contentType="text/html; charset=UTF-8" import="java.sql.*" %>
<%
String act = request.getParameter("act");
String pwd = request.getParameter("pwd");
Class.forName("com.mysql.jdbc.Driver");
String url = "jdbc:mysql://localhost:3306/company?user=root&password=apple&charset=utf8";
Connection con = DriverManager.getConnection(url);
Statement stmt = con.createStatement();
String strSQL = "SELECT * FROM employee where e_name = '" + act + "'";
ResultSet rs = stmt.executeQuery(strSQL);
if (
pwd != null
&& rs.next()
&& rs.getString("pwd") != null
&& pwd.equals(rs.getString("pwd"))
){
session.setAttribute("uid",act);
session.setAttribute("c_name",rs.getString("c_name"));
response.sendRedirect("guest_book.jsp");
} else {
response.sendRedirect("error.html");
} //if
stmt.close();
con.close();
%>
error.html
帳號或密碼錯誤
<a href='index.jsp'>重新輸入</a>
Result:

guest_book.jsp
<%@ page contentType="text/html; charset=UTF-8" import="java.sql.*" %>
<html>
<head>
<title>留言板</title>
</head>
<%
if (session.getAttribute("uid") == null){
response.sendRedirect("error.html");
} //if
%>
<body bgcolor='skyblue'>
<font color='blue'><b><%= session.getAttribute("c_name")%></b></font> 你好! 歡迎蒞臨 SQL 留言板</br></br>
<form name='logout' method='post' action='logout.jsp'>
<input type='submit' value='登出'>
<a href='./logout.jsp'>登出</a>
</form>
<hr>
<form name='f1' method='post' action='input.jsp'>
<textarea name='content'>請留言</textarea>
<input type='submit' value='提交'>
</form>
// 畫表格
<table border='1' width='80%'>
<%
Class.forName("com.mysql.jdbc.Driver");
String url = "jdbc:mysql://localhost:3306/company?user=root&password=apple&charset=utf8";
Connection con = DriverManager.getConnection(url);
Statement stmt = con.createStatement();
// select 資料後,依照時間反向排列,再放入 ResultSet。
String strSQL = "SELECT * FROM guest_book ORDER BY w_time DESC";
ResultSet rs = stmt.executeQuery(strSQL);
while ( rs.next() ){
out.print( "<tr><td><font color='blue'>" +rs.getString("g_name") +"</font></td>");
out.print( "<td>" +rs.getString("w_time") +"</td></tr>");
out.print( "<tr><td colspan='2'>" +rs.getString("w_content") +"</td></tr>");
}
stmt.close();
con.close();
%>
</table>
</body>
</html>
Result:

馬上留言之後,最新的留言在最上面

logout.jsp (無畫面)
<%
session.setAttribute("uid",null);
response.sendRedirect("index.jsp");
%>
input.jsp (無畫面)
<%@ page contentType="text/html; charset=UTF-8" import="java.sql.*" %>
<%
if (session.getAttribute("uid") ==null){
response.sendRedirect("error.html");
} //if
String content = request.getParameter("content");
//先將留言板內的字型轉為 UTF-8,以免產生亂碼 。
if ( content != null && content.length() >0 ){
content = new String (content.getBytes("ISO-8859-1"), "UTF-8");
//將特殊符號改成全形,也面被有心人士破壞。
content = content.replace('<','<');
content = content.replace('>','>');
content = content.replace('\'','’');
content = content.replace('\"','”');
Class.forName("com.mysql.jdbc.Driver");
String url = "jdbc:mysql://localhost:3306/company?user=root&password=apple&charset=utf8";
Connection con = DriverManager.getConnection(url);
Statement stmt = con.createStatement();
//將留言板的資料寫入資料庫
String strSQL = "INSERT INTO guest_book (g_name, w_content) VALUES ('"
+ session.getAttribute("c_name") +"','" +content +"')";
// out.print(strSQL); 先利用這一行來檢查 SQL 語法是否正確。
stmt.execute(strSQL);
stmt.close();
con.close();
} //if
//寫完資料後,導回"guest_book.jsp"就可顯示出所有資料。
response.sendRedirect("guest_book.jsp");
%>
Subscribe to:
Posts (Atom)